Elevator access control management
In the main interface of the system, click [Elevator Access Control] in the drop-down menu of [Elevator Access Control], as shown in the following figure:
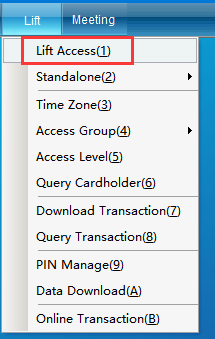
Click [Elevator Access Control Management] to enter the interface as shown below:

Add elevator controller
To add an elevator controller, in the elevator access control management interface, click Add [Add] to pop up the interface as shown below:
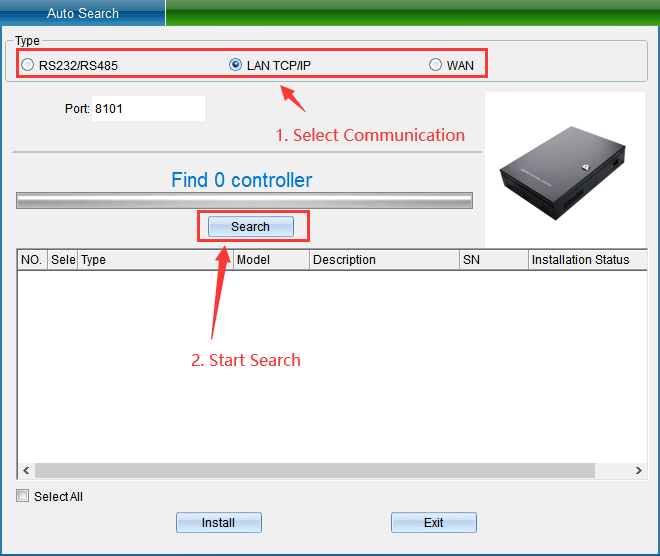
Click [Start Search], the system will automatically search for the device. After the search, the relevant information of the device will be displayed and a prompt window will pop up, showing how many devices have been searched, as shown in the following figure:
If the communication mode selected by your device is TCP/IP communication mode, and you need to modify the IP address of the device, then you can double-click the IP of the device to be installed, and a TCP connection parameter window will pop up, as shown in the following figure:

In this interface, you can double-click the IP address, subnet mask, and gateway address to change the parameters that match the computer IP or LAN segment, and then click [Save] to return to the installation interface to wait for the IP parameters to be modified. The modification is completed. After that, a prompt window will pop up, as shown below:
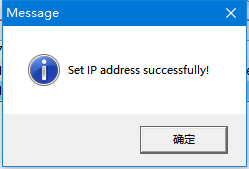
Click [OK] to modify the device IP successfully.
After selecting the communication method, click [Start Search], click the device to be installed, and then click [Install Device], and the elevator controller information diagram will pop up as shown below:
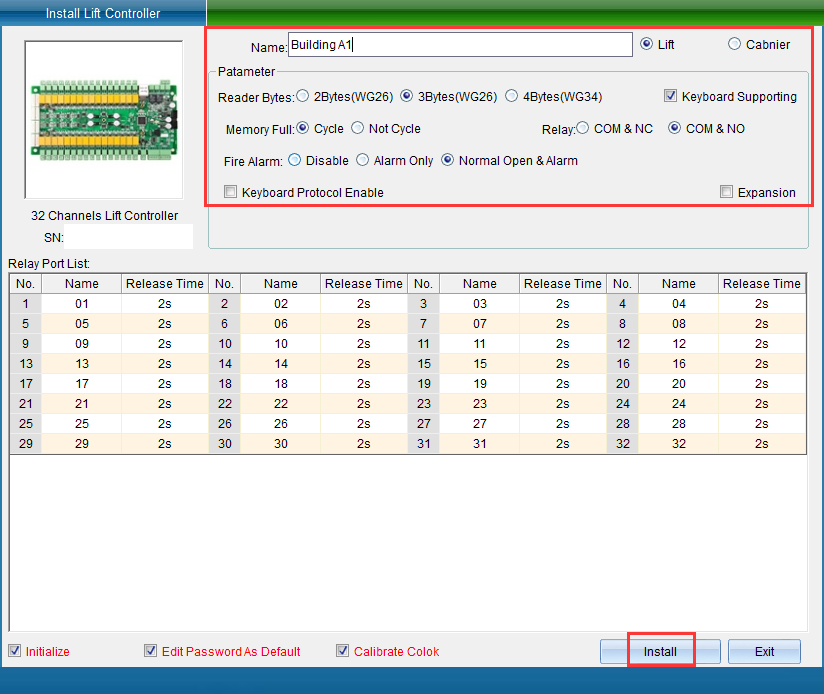
Enter the elevator name in the "Controller Name" input box, select the elevator mode, set the equipment parameters, set the elevator output time, etc. If you want to change the floor name or need to add a floor expansion board, you can tick the "expansion board" in this interface, and finally Click [Install], after the installation is complete, a window will pop up prompting "Installation complete", click [OK], and then click [Exit] to return to the elevator access control management interface.
Elevator controller parameter setting
In the elevator control management interface, select the installed elevator controller, click [Properties], and the following window will pop up:
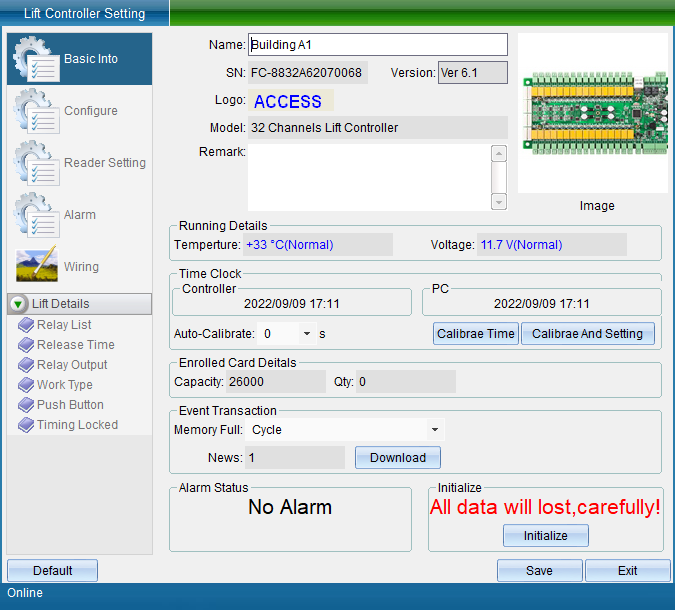
Elevator basic information settings
In this interface, click "Basic Information of Elevator" to modify the name of the controller, adjust the clock and modify the parameters, and select the storage method of the event record, as shown in the following figure:
After setting the relevant parameters, click [Save], a window will pop up prompting "Save complete", click [OK], the save is successful.
Connection parameter settings
Click "Connect Communication Settings" to modify the IP of the elevator controller, set the communication password, etc., as shown in the figure below:
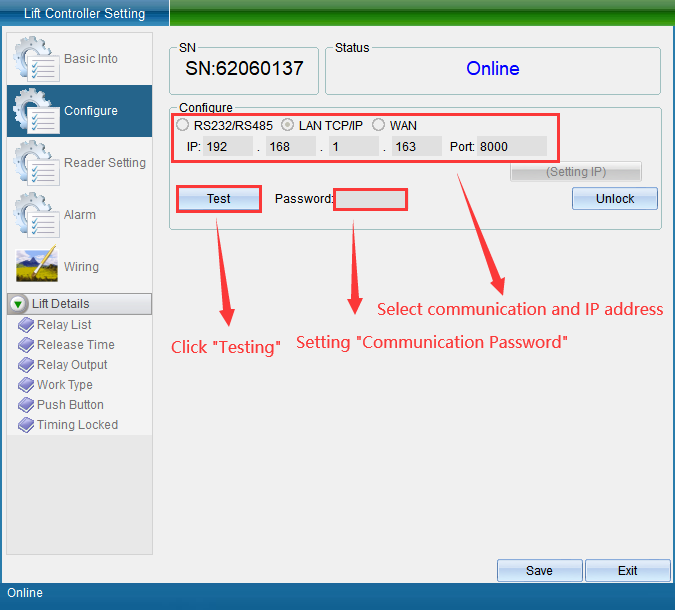
A communication password can be set to ensure the security of communication. Click [Unlock Parameters], and then click [Set Device TCP/IP Parameters], and the interface as shown below will pop up:
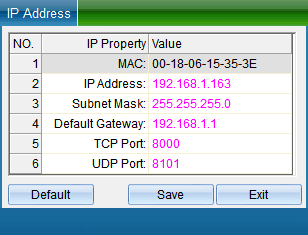
To modify the TCP connection parameters, double-click to modify the IP address, and then click [Save], a prompt window will pop up, as shown below:
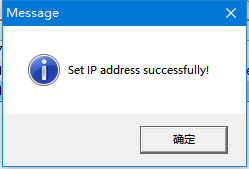
Click [OK] to set the TCP parameters successfully. After modifying the IP address, click [Test Connection], and the interface as shown below will pop up:
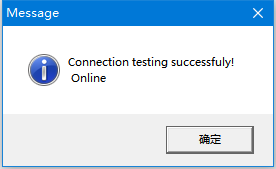
Click [OK], and then click [Save].
Advanced parameter settings
Click "Advanced Parameter Settings" to set the card reader type, card reader line abnormality detection, card reader authentication method, etc., as shown in the following figure:
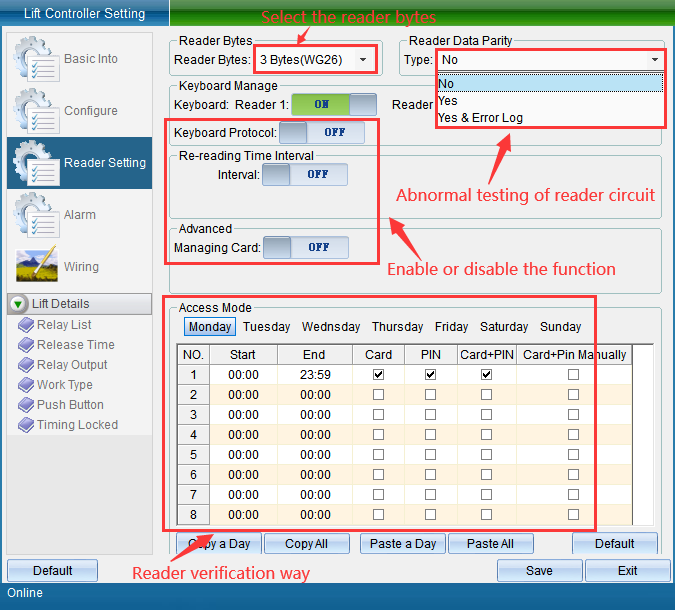
In this interface, select the card reader type| (default is 3 bytes), the card reader line abnormal detection method, whether to enable the keyboard management function, the card reading interval function, the management card function, the setting card reader authentication method, etc., set After completing the relevant parameters, click [Save].
Alarm parameter setting
Click "Alarm Parameters" to set whether to enable the fire alarm function, duress alarm function, unregistered card function, etc., as shown in the following figure:
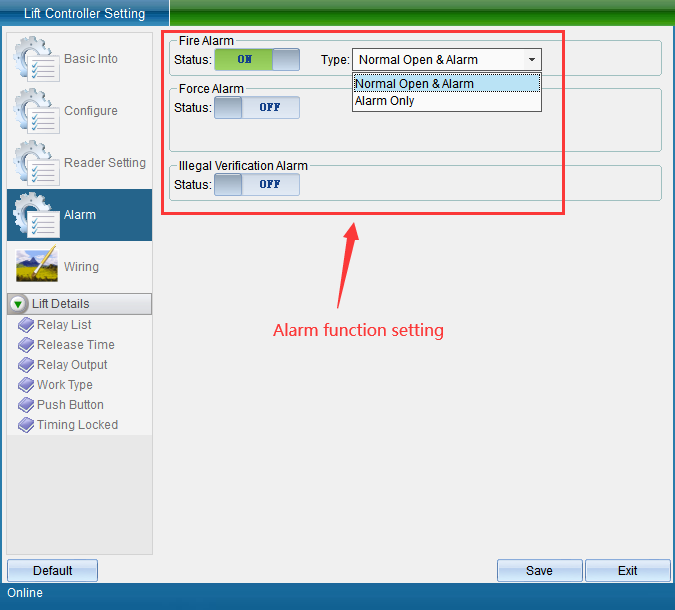
After setting related alarm functions, click [Save].
Wiring demo
Click "Wiring Demonstration", you can view the connection diagram of this equipment for this elevator controller, as shown in the following figure:
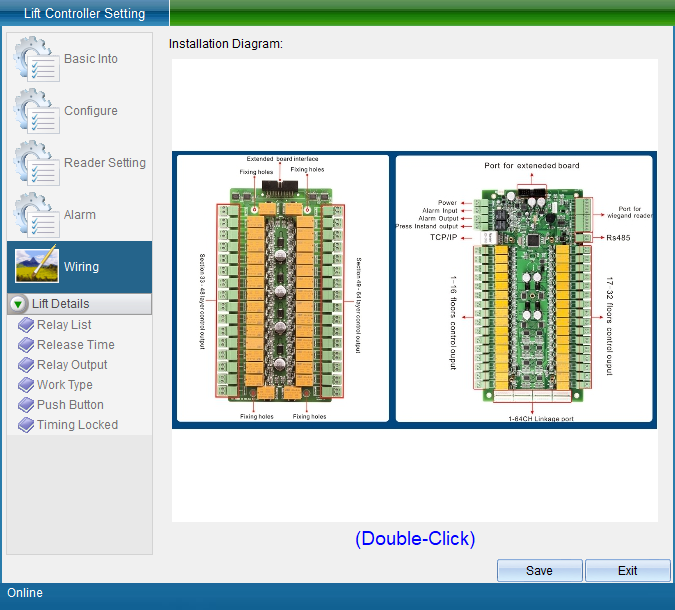
Select the picture, double-click to view the larger picture, and click [Save] after viewing.
Elevator Details
Click "Elevator Details" to set the floor information, drive output duration, switch signal parameters, floor working mode, manual control function, timing lock function, etc., as shown in the following figure:
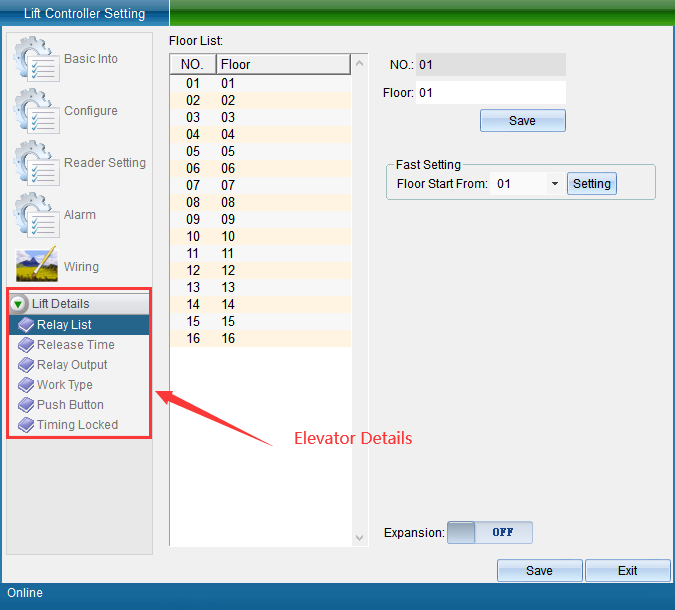
Floor information settings
Click "floor information" to set the elevator floor, as shown in the following figure:
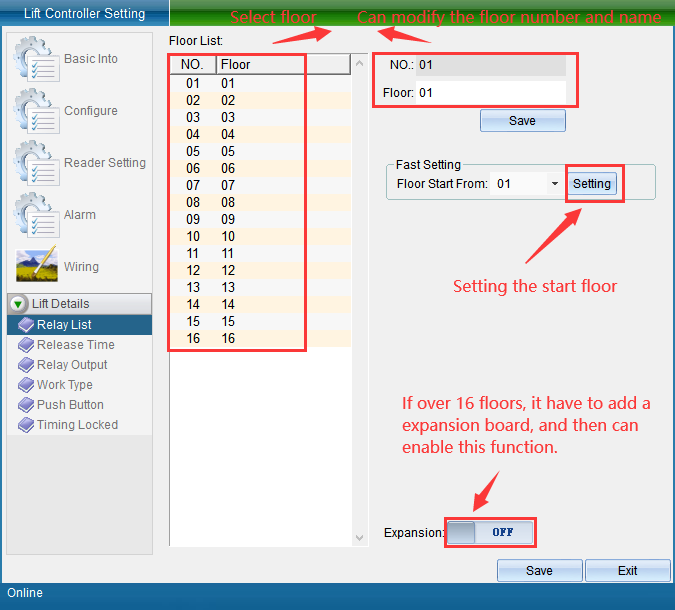
In this interface, you can set the starting number of the floor and modify the floor name. If there are many floors, you can open the floor expansion board. After setting the relevant parameters, click [Save].
Drive output duration
Click "Drive Output Duration", you can select the floor to be set to set the drive output settings, as shown in the following figure:
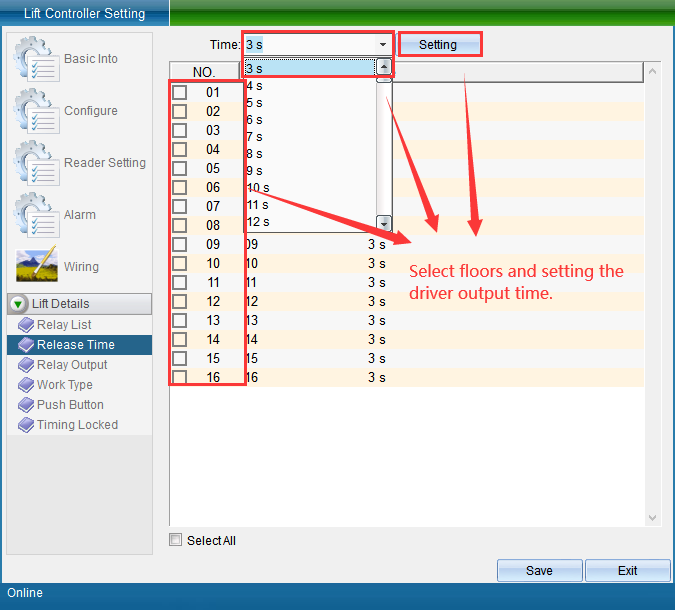
After setting the drive output duration, click [Save].
Switch signal parameters
Click "Switch Signal Parameters" to set the switch signal, as shown in the figure below:

According to actual needs, select the floor, set the relevant switch signal, and then click [Save].
There are three types of switching signals: normally open signal (COM is often connected to NO), normally closed signal (COM is often connected to NC), and card reading switching (bistable).
How floors work
Click "floor working mode" to set floor working mode, as shown in the following figure:

The working mode of this floor is disabled by default. If necessary, you can also enable this function to make settings. After setting, click [Save].
There are two working modes of the floor: normally open mode and first card mode.
Manual control function
Click "Manual Control Function" to set the opening time of the floor, as shown in the following figure:
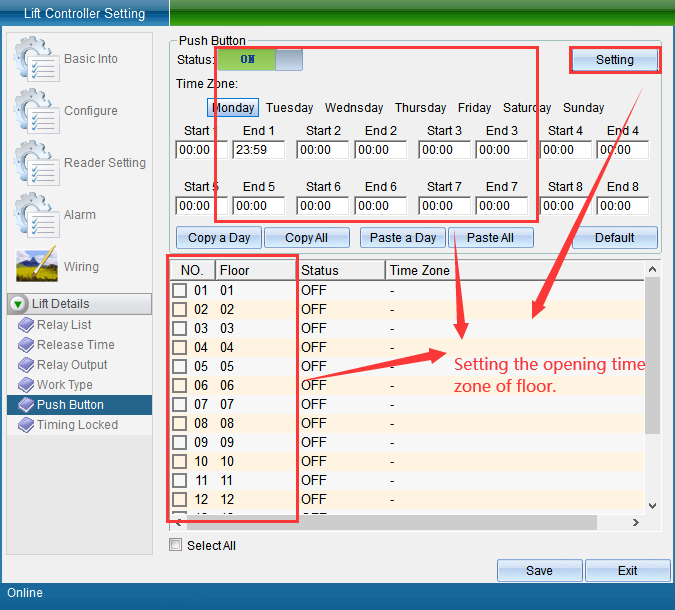
At that time, the lock function is disabled by default. You can also enable this function according to your needs, select the floor, set the timing lock period, and then click [Save].
Elevator access control unlocking/closing
The elevator access control can be unlocked and closed, as shown in the following figure:

elevator access control
Select the elevator controller and floor to be unlocked, and then click [Unlock], as shown in the following figure:

Click [Unlock], after that, a verification window will pop up, as shown below:
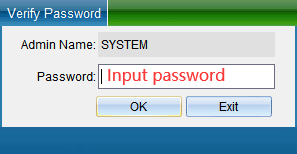
In the verification password window, enter the password, and then click [Verify], you can see that the corresponding door is opened and the door is unlocked successfully.
elevator access control lock
Select the device and floor to be locked, and then click [Lock], as shown in the following figure:
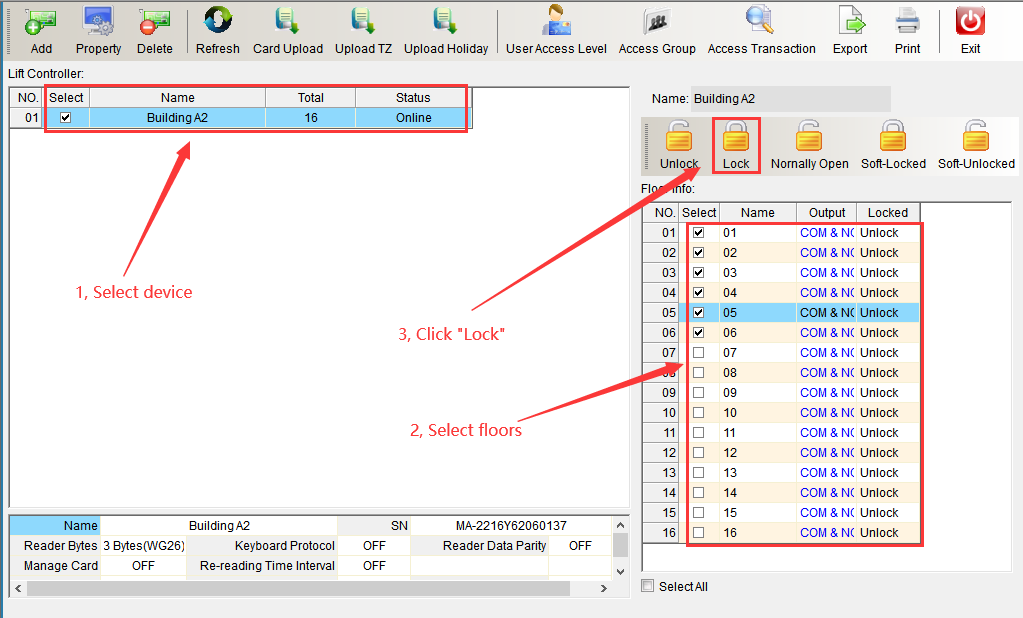
After clicking [Lock], a verification window will pop up, as shown below:
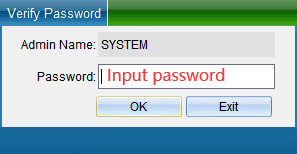
In this interface, enter the password, and then click [Verify], you can see that the relevant door is locked, and the lock is successful.
Since the operations of [Normal Open], [Lock], and [Unlock] are basically the same as the above operations, you can refer to the above operations to perform related operations on the elevator controller.
Elevator time management
In the main interface of the system, click [Time Period Management] in the [Elevator Access Control] drop-down menu, as shown in the following figure:
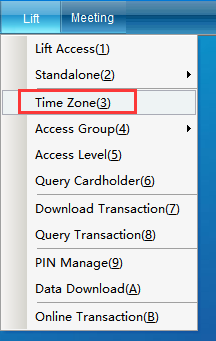
Click [Time Period Management] to enter the interface as shown below:

Default data: Group 01 time period, Monday to Sunday, valid for 24 hours, and group 02-64 time period is invalid by default, if you want to add a new opening time period, you can click the opening time period 02 to start adding a time period, as shown in the following figure:
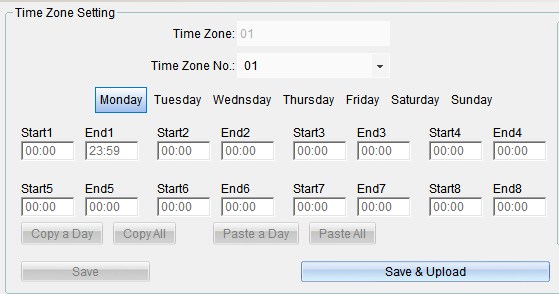
The name of the opening time period can be changed, and the opening time period can be limited to 8 different time periods from Monday to Sunday.
The set period can be copied to the time of other weeks.
If the time is set on [Monday], click [Copy single-day data], click [Tuesday], and select [Paste single-day data], and the same operation is performed from Wednesday to Sunday. Set the completion point [Save time period database] or click [Save and upload to all access control controllers], and click [Finish] to exit when the time period is uploaded.
If you need multiple time periods, but most of the time is the same, you can use copying the entire time period and pasting the entire time period to operate. , click [Paste Entire Period] to copy the opening period time of period 2 to period 3, and then click [Save and upload to all access control controllers].
If you do not need [Open Period Management], you can click [Restore to System Default].
After the time period is set, if you need to assign a time period to the user, you need to assign the time period to the corresponding user at [Elevator Privilege Management], so that you can control the user to enter and leave the designated elevator in the designated time period.
Elevator permission management
In the main interface of the system, click the [Elevator Access Control] drop-down menu [Elevator Privilege Management] as shown in the following figure:
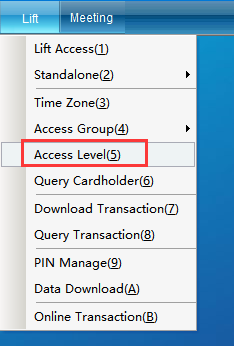
Click [Elevator Privilege Management] to enter the interface as shown below:
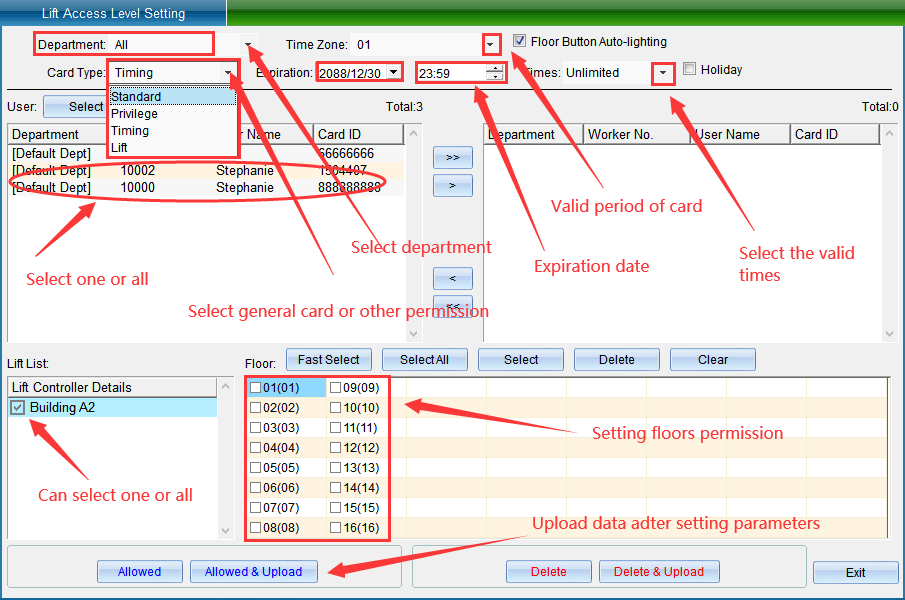
In the "Department Name" interface of setting elevator permissions, you can add permissions by department or all personnel.
The opening time period can be set in the time period set in "Elevator Time Period Management" according to actual needs.
If you want to set the valid time and times for the sent users, you can set them in the "valid period" and "card swiping times" according to actual needs;
If you want to limit the user to only a certain floor, you can check it in the floor box; for example, if the permission to Li Si can only go to the 9th and 11th floors, then select Li Si to Selected in the optional personnel. personnel, check the 09th floor and the 11th floor in the floor box at the same time, and then click [Allow selected personnel to pass through the selected floor and upload].
View elevator permissions
In the main interface of the system, click [View Elevator Permissions] in the [Elevator Access Control] drop-down menu, as shown in the following figure:
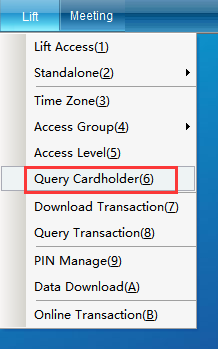
Click [View Elevator Permissions] to enter the interface as shown below:
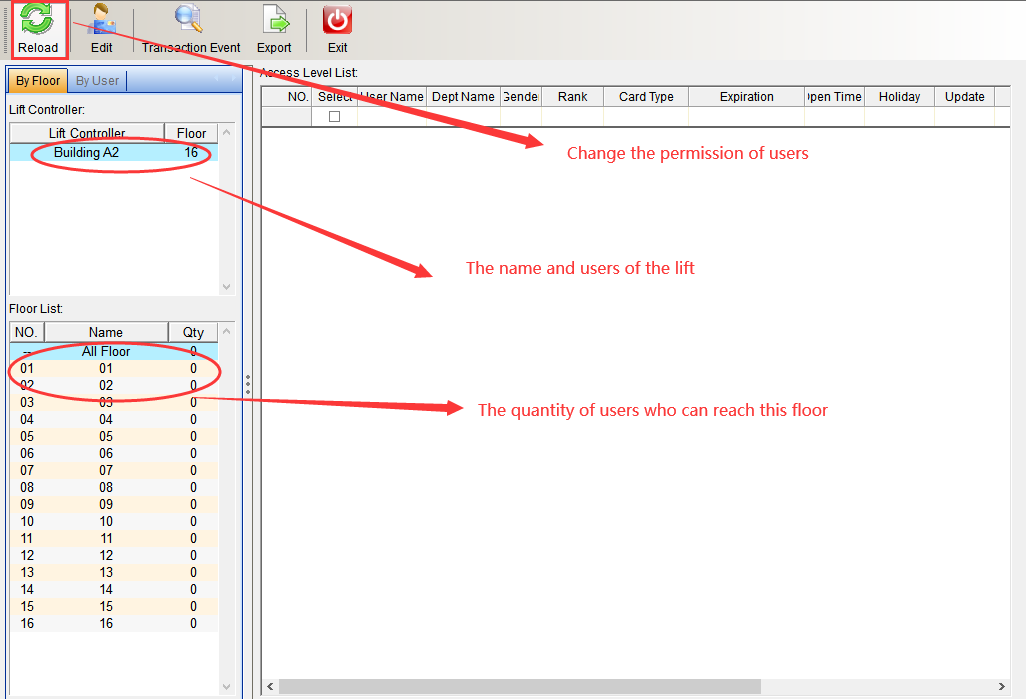
Click [Change Authorization] to modify the elevator authority. (Note: To change the authority, you need to delete the original authority first, and then reset the authority.) To change the authority, please refer to the elevator authority setting operation steps.
Conditional query can also be performed to query the authority of the person in the elevator, as shown in the following figure:
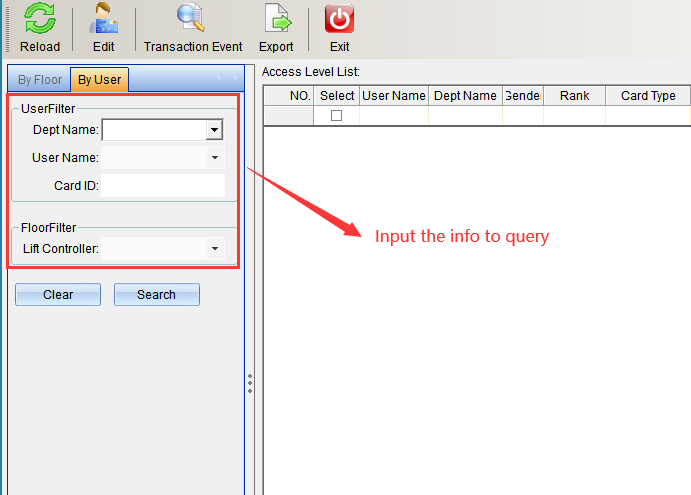
After entering the query conditions, click [Search] to query the permissions of the relevant personnel in the elevator.
Extract elevator records
In the main interface of the system, click [Extract Elevator Record] in the [Elevator Access Control] drop-down menu, as shown in the following figure:
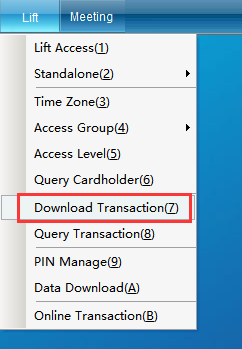
Click [Extract Elevator Record], and the interface as shown below will pop up:
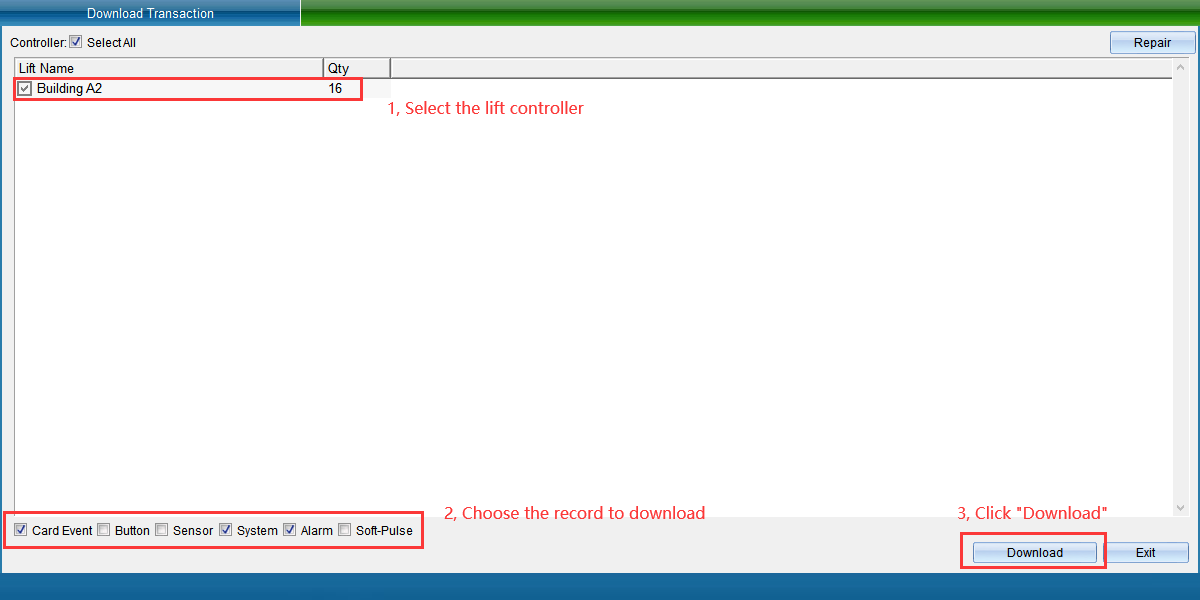
Select the elevator controller whose records need to be extracted, check the records to be collected, and then click [collect selected equipment records] to enter the interface as shown below:

After collecting the data, click [Finish].
View elevator records
After extracting the elevator records, you can view the elevator records. In the main interface of the system, click [View Elevator Record] in the [Elevator Access Control] drop-down menu, as shown in the following figure:
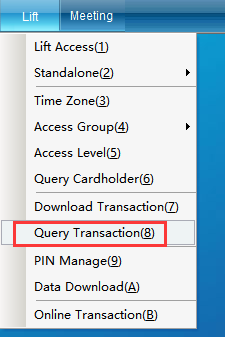
Click [View Elevator Record] to enter the interface as shown below:
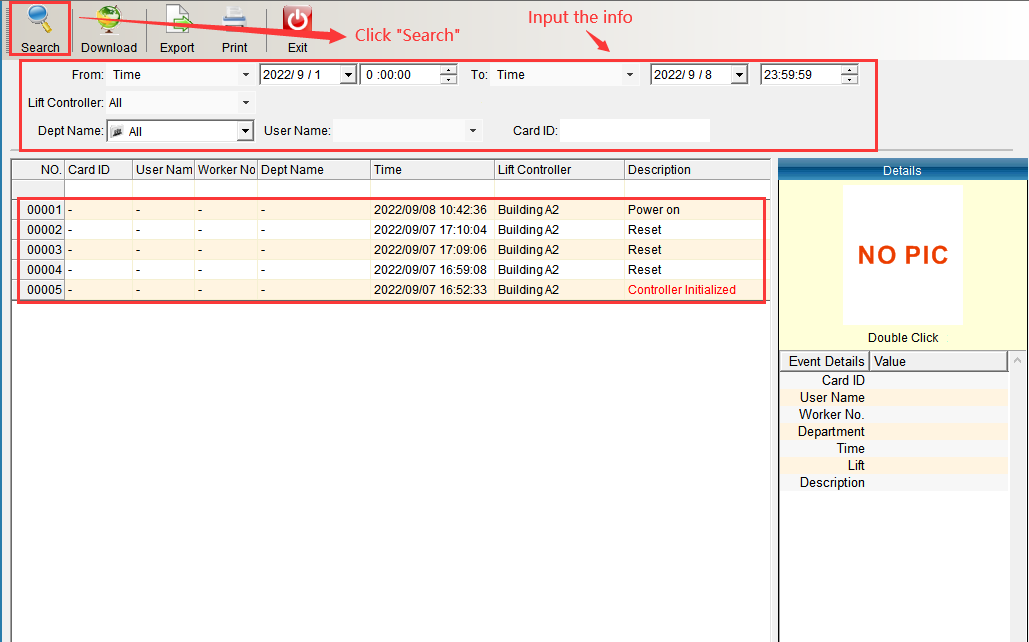
After entering the conditions, click [Search] to query the elevator records, and the records found will be displayed in the interface.
elevator code
In the main interface of the system, click [Elevator Password] in the [Elevator Access Control] drop-down menu, as shown in the figure below:
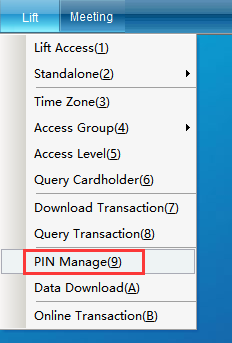
Click [Elevator Password] to enter the interface as shown below:
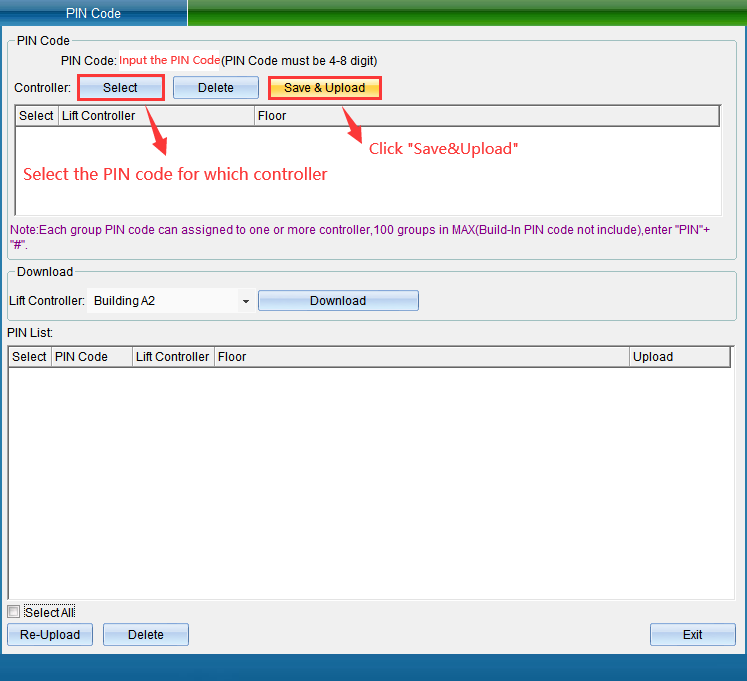
Enter 4-8 digits in the "Open Door Password" input box, set the door open password, click [Select], select the controller for which the password is applicable, click [Select], and the interface as shown below will pop up:
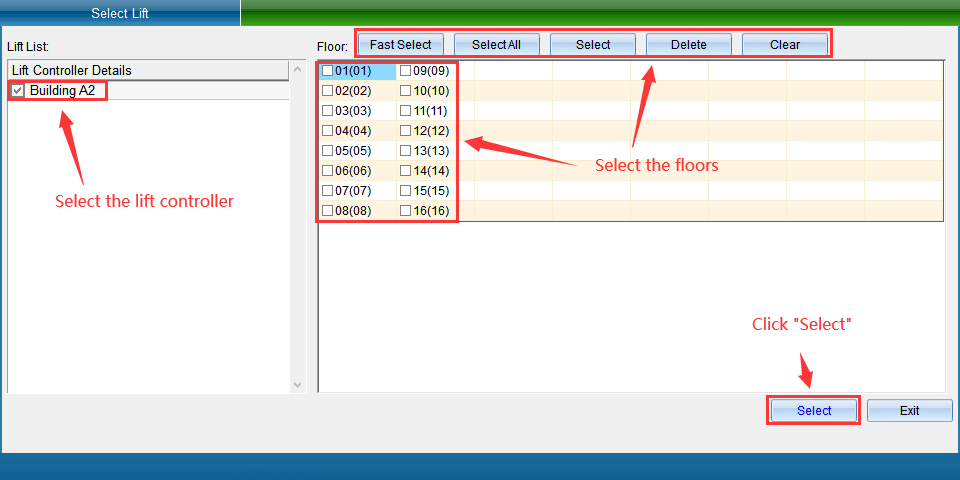
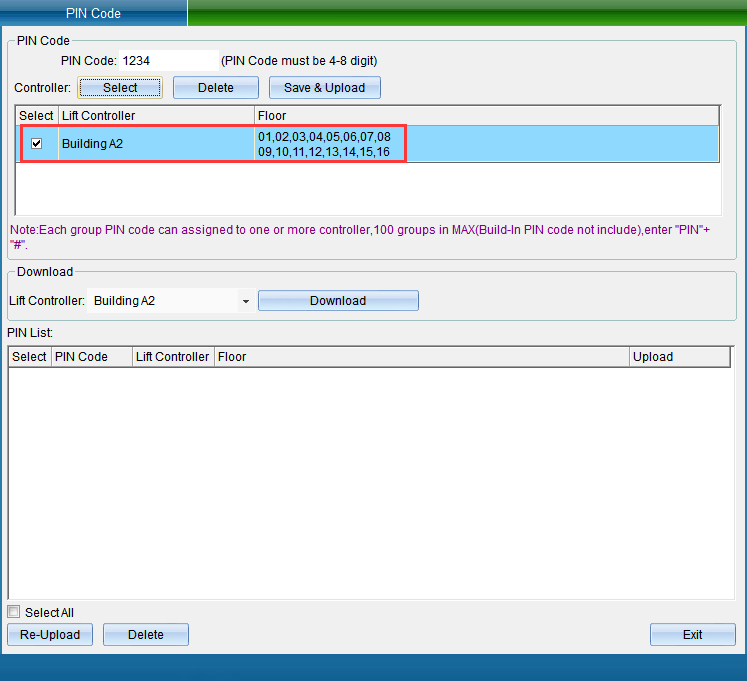
Select the appropriate elevator controller, select the floor that requires the door opening password, and then click [Select], the selected elevator controller will be displayed on the "Door opening password" interface, as shown in the following figure:
Then click [Save and Upload], and the controller that has uploaded the door opening password will be displayed in the "Open Door Password List", and a prompt window will pop up, as shown in the following figure:
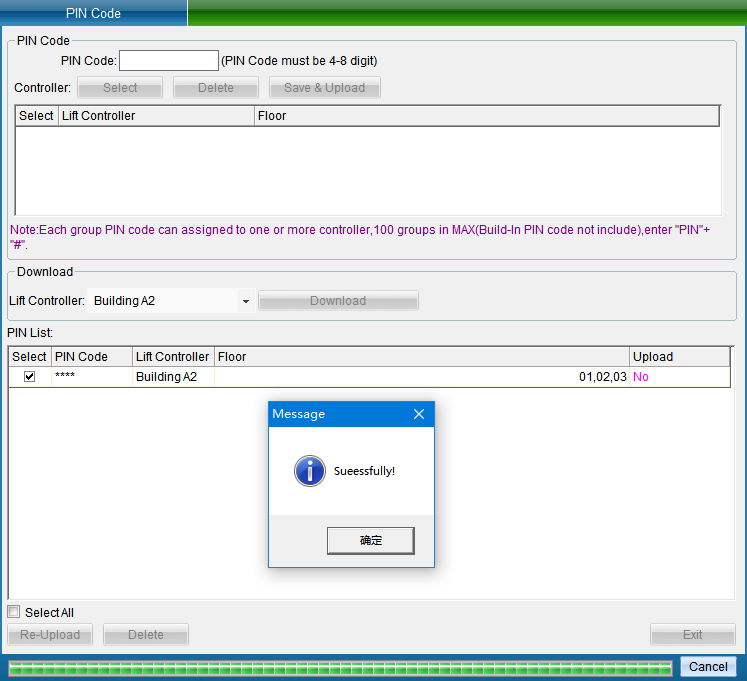
Click [OK] to upload the door opening password successfully, click [Read the door opening password from the controller], a prompt window will pop up, as shown in the following figure:
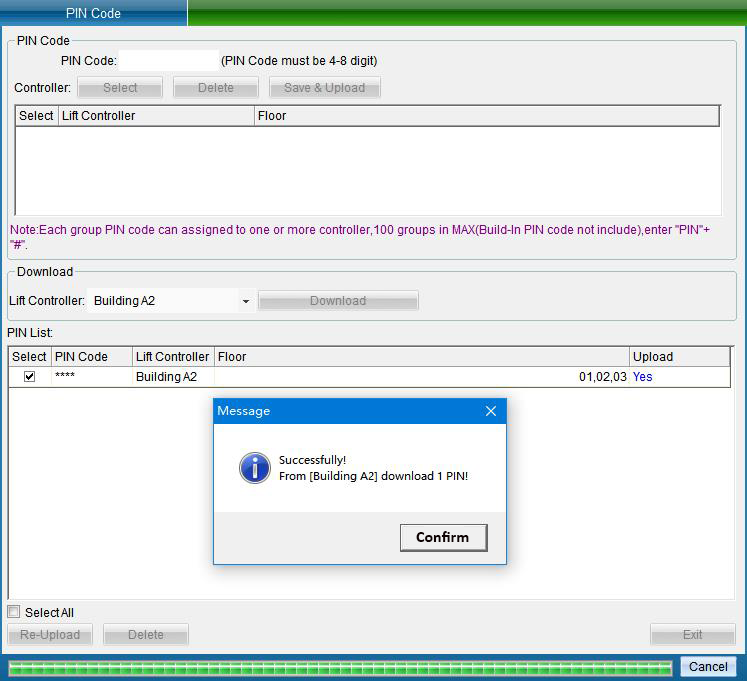
Click [OK] to extract the password successfully.
Get data from elevator
In the main interface of the system, click [Get Data from Elevator] in the [Elevator Access Control] drop-down menu, as shown in the following figure:
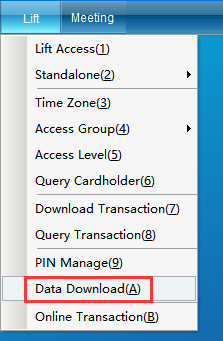
Click [Get Data from Elevator] to enter the interface as shown below:
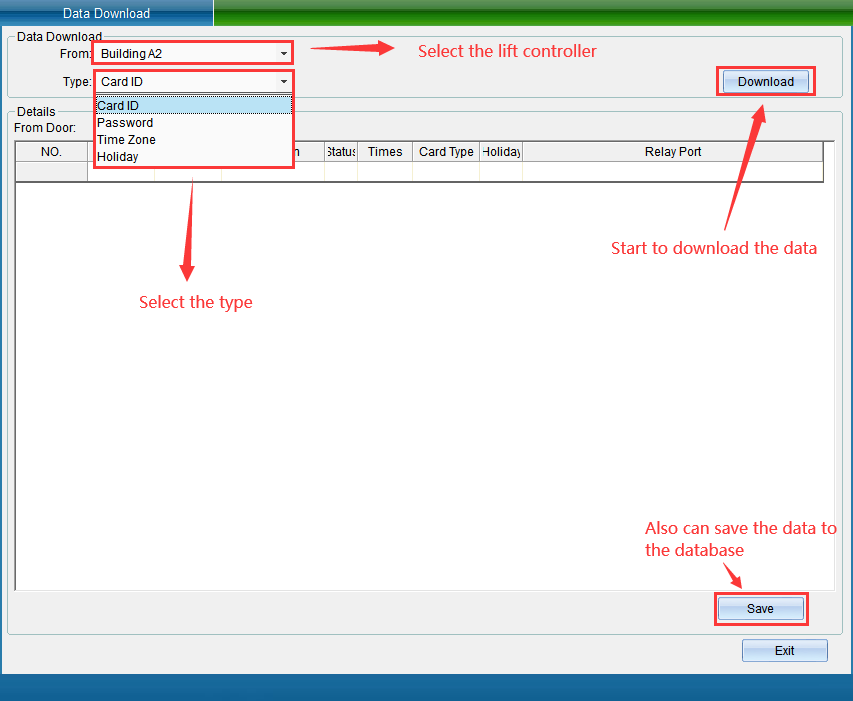
Select the elevator controller, select the type of data to be acquired, and then click [Start to acquire data], as shown in the following figure:
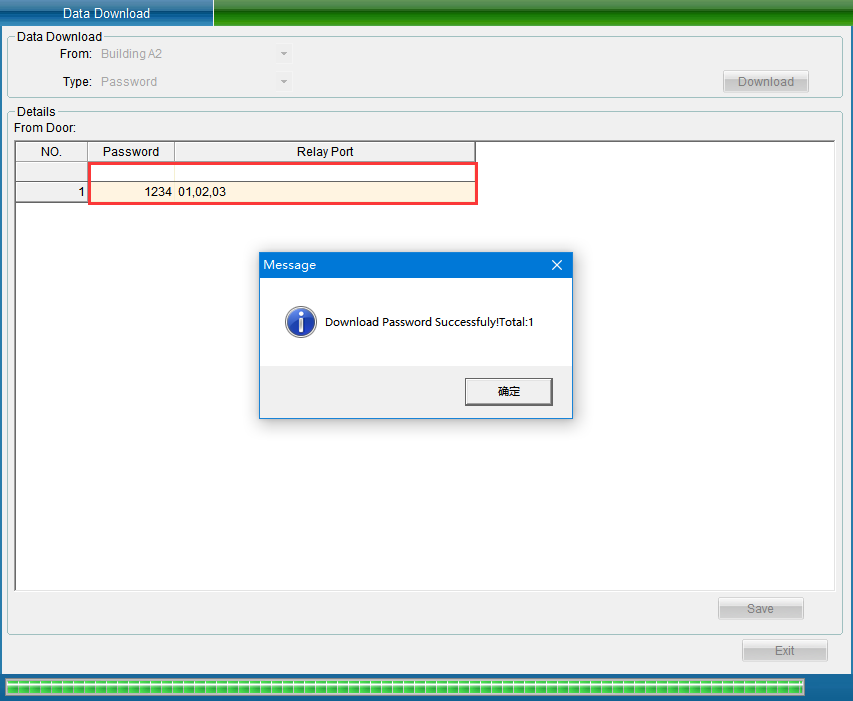
Click [OK] on the pop-up prompt window, and the data acquisition is completed, and it will also be displayed in this interface.
The acquired data can also be saved in the database. For example, if a user accidentally deletes all the data of the software, he can extract the personnel card number, door opening password, and door opening time period from the device, and save the obtained information to the database again. Click [Save to database], a prompt window will pop up, as shown in the following figure:
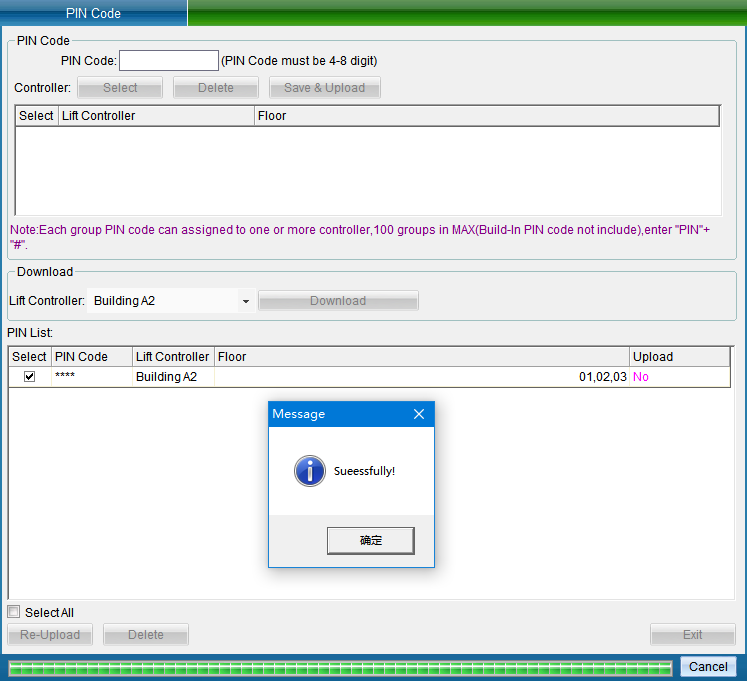
Click [OK] on the prompt window to successfully save the acquired data to the database.
Elevator data monitoring
In the main interface of the system, click [Elevator Data Monitoring] in the [Elevator Access Control] drop-down menu, as shown in the figure below:
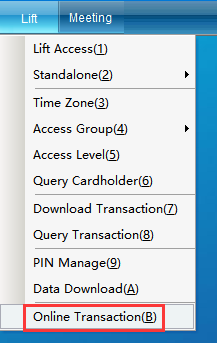
Click [Elevator Data Monitoring] to enter the interface as shown below:
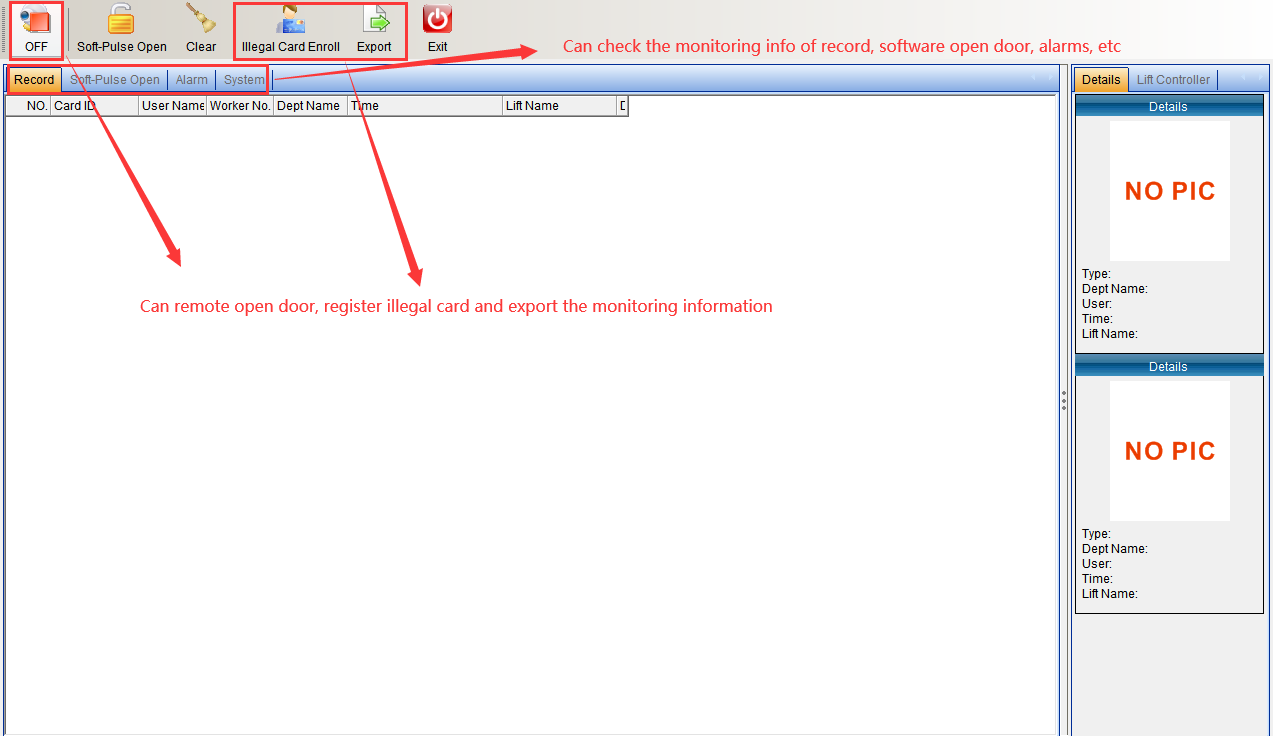
You can open the door remotely for the elevator, click [Remote Open], and the window as shown below will pop up:
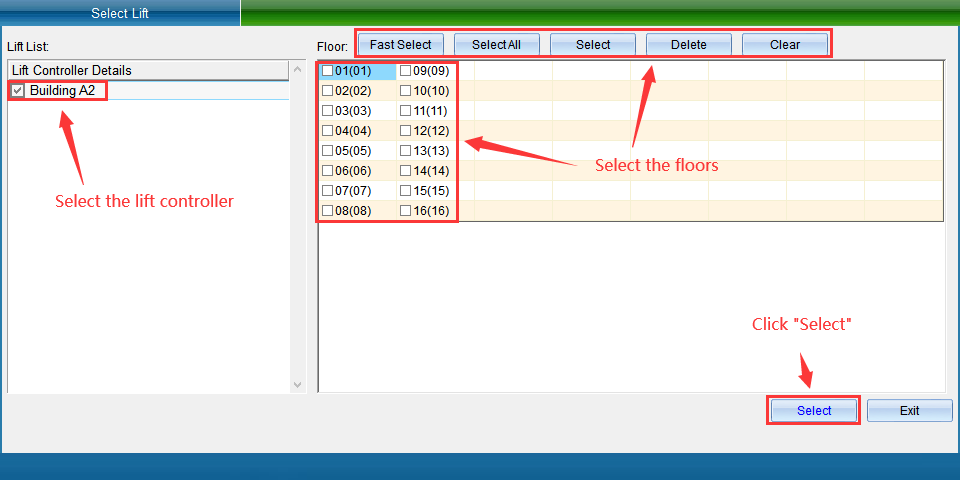
After selecting the controller and floor, click [Select], the elevator will be opened remotely, and the door opening record will be displayed in "Record Monitoring" and "Software Door Open Monitoring", as shown in the following figure:


You can also put unregistered cards into the warehouse. To import unregistered cards, you can swipe the card on the card reader, and then click [Unregistered Cards into Warehouse], and the [Automatic Card Issuance] interface will pop up.