Main menu
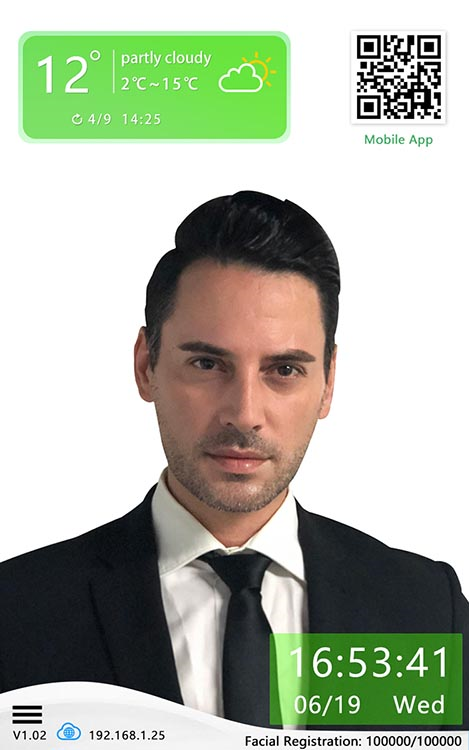
Click the "Menu button" in the lower left corner (as indicated by the arrow on the main interface in the figure below) to enter the "Administrator Login" interface, enter the administrator password (the default password is 123456), and click "OK" to enter the face machine management menu.
Personnel management
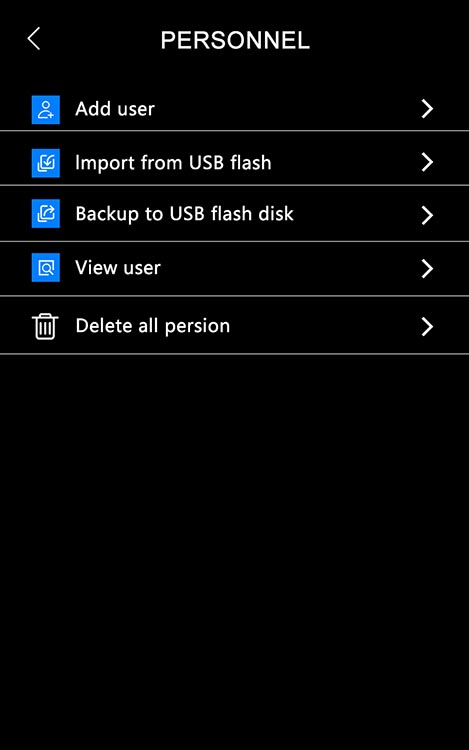
Click "Personnel Management" under the menu to enter the personnel management menu (as shown in the figure below), where you can perform operations such as adding users, importing users in batches, and viewing users.
New users
Click "Add User" (add user interface as shown in the figure below) to start registering a new user. You can select three types of new users according to your needs: card number, ID number and face. Select the card number, name and ID number, and an input keyboard interface will pop up (as shown in the keyboard interface below), enter the user information, and click "return" to confirm.
After the registration is complete, click "Confirm" to complete the entry of the new user.
The registration card number and ID number can be directly keyed in or registered directly by swiping the card.
Register a face, click the "Face Collection" button, and pay attention to the camera when collecting face photos. In order to ensure the quality of face parameter input and the accuracy of comparison, keep a natural expression during the input process, and please do not wear hats, glasses, etc. For accessories that affect the collection of facial features, do not let bangs cover the facial features, and do not wear heavy makeup.
After the device collects the face photos, it will prompt that the input is successful and the face collection is completed (as shown in the figure below).
Import users in bulk
Click "Batch Import Users", and follow the steps inside to import the user information saved in the U disk into the face machine (as shown in the figure below).
View users
Click "View Users" to query and browse the registered users. By default, they are arranged according to the size of the number. You can click "Previous" and "Next" to turn the page to query the display; you can also query by entering the number or name (as shown in the figure below).
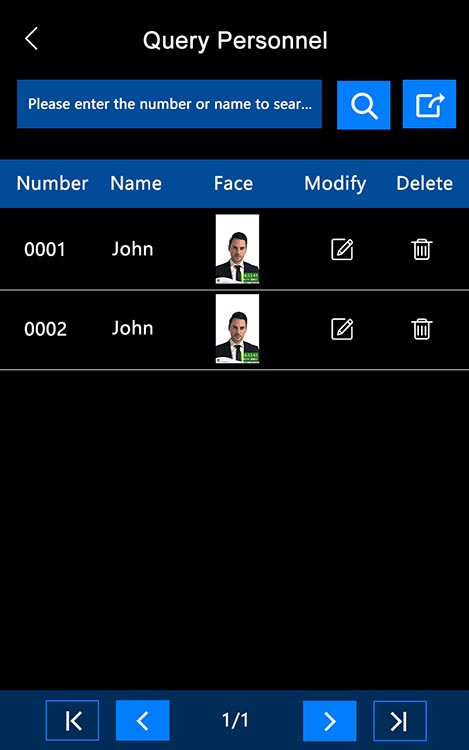
Find the person to be deleted, click "Delete" and then "Confirm" to delete the user.
network settings
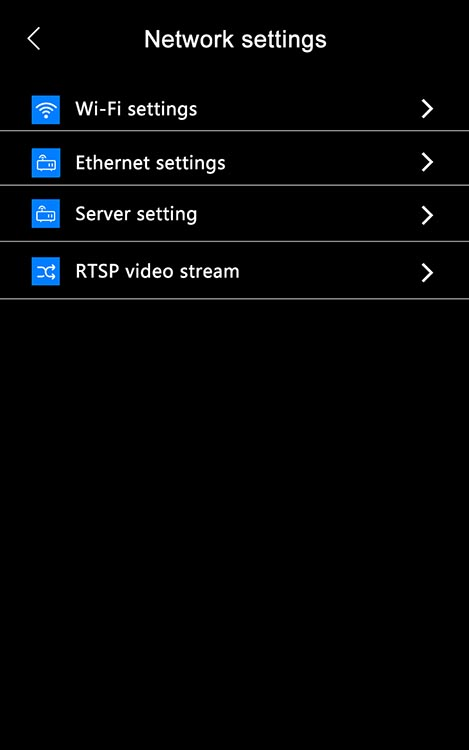
Click "Network Settings" under the menu to enter the network settings menu, which includes WIFI settings and network port settings (as shown in the figure below).
WIFI settings
Click "WIFI Settings" to enable the WIFI networking function (as shown in the figure below).

Network port settings
Click "Network Port Settings" to enable or disable the DHCP function (default disabled). The TCP parameters of the machine can be modified. The default IP address is 192.168.1.150; the default subnet mask is 255.255.255.000; the default gateway is 192.168.1.1; the default DNS server IP is 192.168.1.1; shown).
Server settings
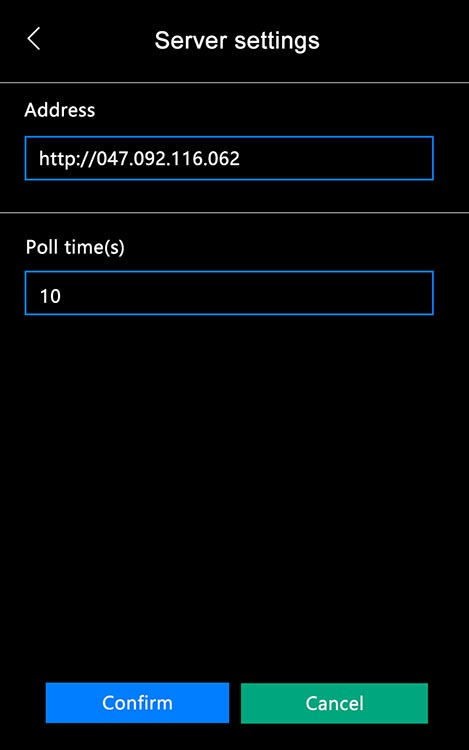
Click "Server Settings" under the menu to enter the server settings menu, where you can set the server address, device polling time and health code address (as shown in the figure below).
Identify settings
Click "Recognition Settings" under the menu to enter the recognition settings menu, where you can set the device's face recognition, body temperature detection and health code operations (as shown in the figure below).
Webpage-Epidemic Prevention Electronic Sentinel Manual V2.71132.png
Health code settings
Click "Health Code Settings" to set the display effect, access method, nucleic acid status, antigen status, vaccine status and desensitization of the access record of the device health code (as shown in the figure below).
ID card comparison
1. The user stands in front of the electronic sentry and can see the temperature measurement dotted line on the screen (as shown in the figure below), keep the forehead in the face temperature measurement area, the device detects the body temperature, if the body temperature is too high, an abnormal body temperature alarm will occur. If your body temperature is normal, you will be prompted to swipe your health code or ID card to proceed to the next step.
2. Place the ID card in the ID card identification area of the device (as shown in the figure below), the device prompts [Reading please wait later], please note that the ID card cannot be removed at this time to avoid the failure to read the ID card.
Tip: When the device prompts "Failed to read, please re-swipe", it may be because the ID card placement area is incorrect, or the ID card fails to be read due to the movement of the ID card in the card reader. At this time, you can remove the ID card and read the ID card again.
3. After reading the ID card information, the device will query the ID card information online and start to compare the ID card. At this time, you need to keep the face facing the screen and the face is in the screen wireframe.
Tip: If it prompts [Authentication verification failed], please try again. In this case, the identification may fail due to the large difference between the ID photo and the current person, or the blocking of eyes and hats.
After verification, the personnel's health code information will be read online and displayed (as shown in the figure below).
Webpage-Epidemic Prevention Electronic Sentinel Manual V2.71634.png.
4. When the health green code is issued, the personnel ID card information and on-site photos will be uploaded to the worker's real-name system platform. And the device prompts [Guest upload is successful, please wait for review] (as shown in the figure below).
5. At this point, it means that the real-name system information collection is completed.
Health code verification
1.The user stands in front of the electronic sentinel and can see the temperature measurement dotted line on the screen (as shown in the figure below), keep the forehead in the face temperature measurement area, and the device detects the body temperature. If the body temperature is too high, an "abnormal body temperature" alarm will appear. , when the body temperature is normal, you will be prompted to swipe your health code or ID card to proceed to the next step.
2. Open the personal health code, point the health code at the camera at the bottom left of the device, and keep the distance between 5~20CM. After reading the health code information, the device will query the health code information online and display the health code information (as shown in the figure below) , the green code prompts "green code, please pass", and the yellow code or red code is forbidden to pass.
Tip: When the device prompts "health code query failed, please re-swipe", it may be because the opened health code type is incorrect. At this time, please confirm whether the opened health code is supported, and then scan the code again.
Cloud network permission settings
1.Open WeChat on your mobile phone and select the applet [Cloud Building Service Manager] (as shown in the figure below).
2. After entering the account and password to log in, select the item where the device is located (as shown in the figure below).
3. After entering the project page, click one-click registration (as shown in the figure below).
4. After selecting the personnel, click to select the personnel to be operated (as shown in the figure below).
5. Click "Register with Real Name" to register the person as a project employee.
Click "Visitor Registration" to register the person as a visitor, and the visitor only has the permission to enter and exit on the day.
After the personnel registration is completed, it is necessary to wait for about 5 minutes for the device to synchronize. After the synchronization is completed, the face, ID card and health code can be recognized and opened. (Visitors can only perform verification such as face recognition on devices that allow visitors to pass, otherwise they are prohibited from passing, which can be configured in the background of the real-name system for cloud construction workers.)
After the registration operation, it takes 5-10 minutes for the network to be synchronized after being registered as a worker in the cloud building service housekeeper. After the device and the cloud building network are synchronized, the worker only needs to perform face recognition to automatically query the health code online and identify the opening. brake.
6. Personnel photos are automatically updated.
After registering on the cloud construction network worker's real-name system platform and sending it to the device, if the identity of the person corresponding to the face cannot be correctly identified on the device, the machine can automatically update the recent photo after using the ID card authentication and comparison.
After the ID card data is successfully read, the device will upload a recent photo of the person, and prompt "Recent photo update successfully" to complete the update operation.
Precautions:
1. This product is a precision machine, please handle it with care. Dropping or receiving strong shocks can cause damage or malfunction of the device.
2. Please do not use in environments affected by strong alkalis, organic solvents, corrosive gases, etc.
3. The device needs to be connected to the cloud network and health code service platforms in various places, so the device must be used online, and it will not work normally when it is disconnected from the network.
4. After the device is powered on, you need to wait 1-3 minutes to check the network status. During this period, it may not work properly. This is caused by network delays in different network environments. It is a normal situation, please ensure that the network connection is stable.
5. When swiping the ID card for verification, you need to place the ID card and wait for the device to prompt for information before removing the ID card.