User Manual
Menu
Click the "Firmware Version Area" in the left corner (indicated by the arrow in the main interface figure below) to switch to "Administrator Recognition", verify the administrator's face, and enter the face machine management menu. Or click "Administrator Recognition" to enter the input password interface, input the admin password, and click "OK" to enter the management menu (if no password or administrator is set, the system will not require authentication management password or administrator).
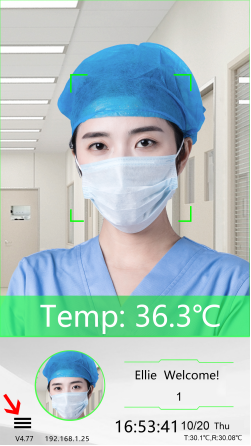
Main Interface (The main interface of individual versions is different)
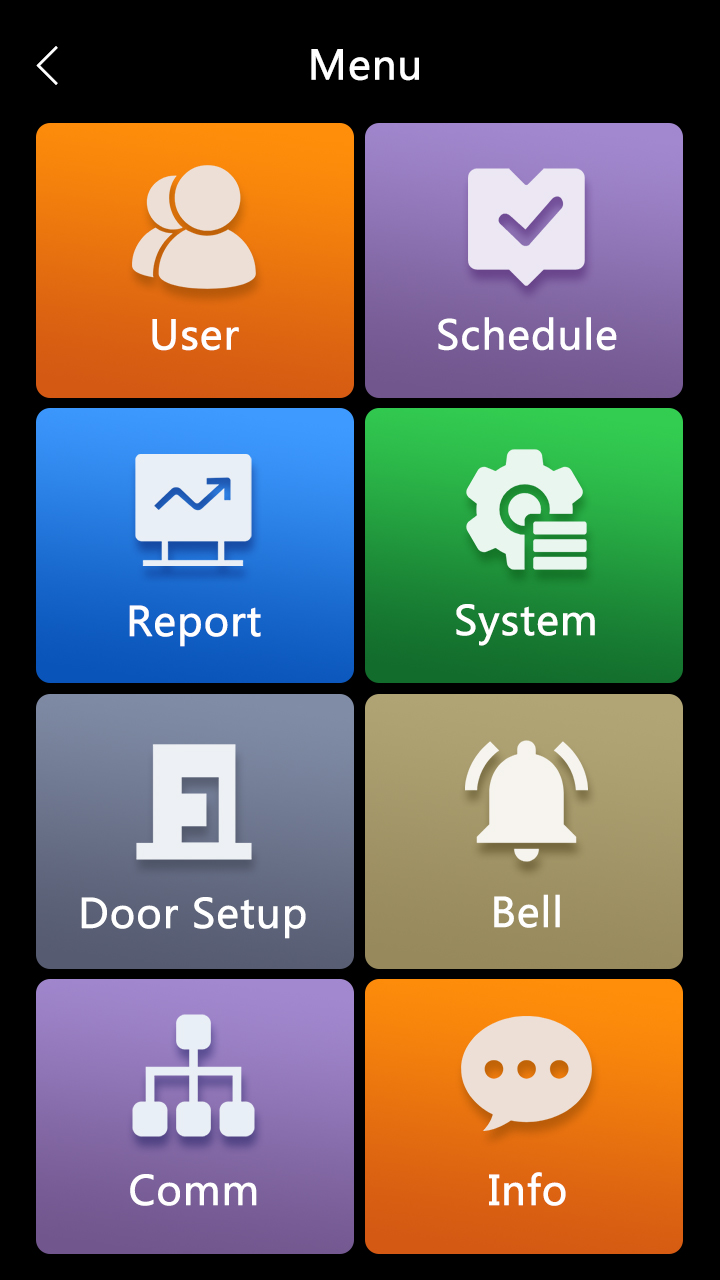
Menu
User Management
Click "User Management" to enter the user management menu. Under this menu, you can do the operation of "Registered User", "User Browsing", "Department Setting", "Registration Information Backup","Registration Information Restore" and etc.
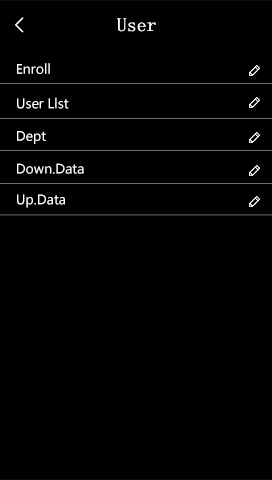
User Management Interface
Register User
Click "Register" to register a new user, enter the user number and name, and then click the "Register" button to select the registration type: register face, register card or register password.
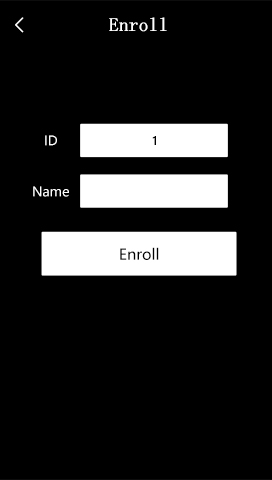
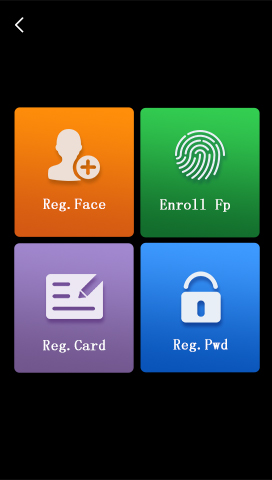
Register User Interface
Select and click the register face button to register the face according to the prompt of the face machine, as shown in the following picture:

Register Face
In order to ensure the quality and accuracy of the parameter input of the face machine, keep a natural expression during the input process. Please do not wear a hat, glasses and other factors to affect the face input, do not let the bangs cover the face, and do not wear heavy makeup. After selecting face photos, please click "Register" button to complete face registration according to the following figure.
After selecting face photos, please click "Register" button to complete face registration according to the following figure.
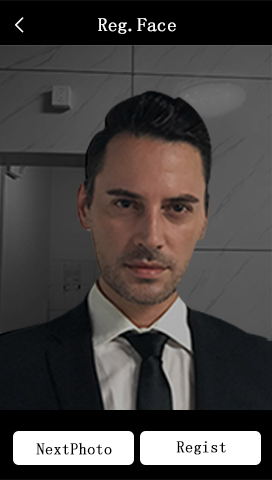
Register Face Interface
Select to register card, and the interface as shown in the figure below. At this time, please swipe the card in the swiping area.
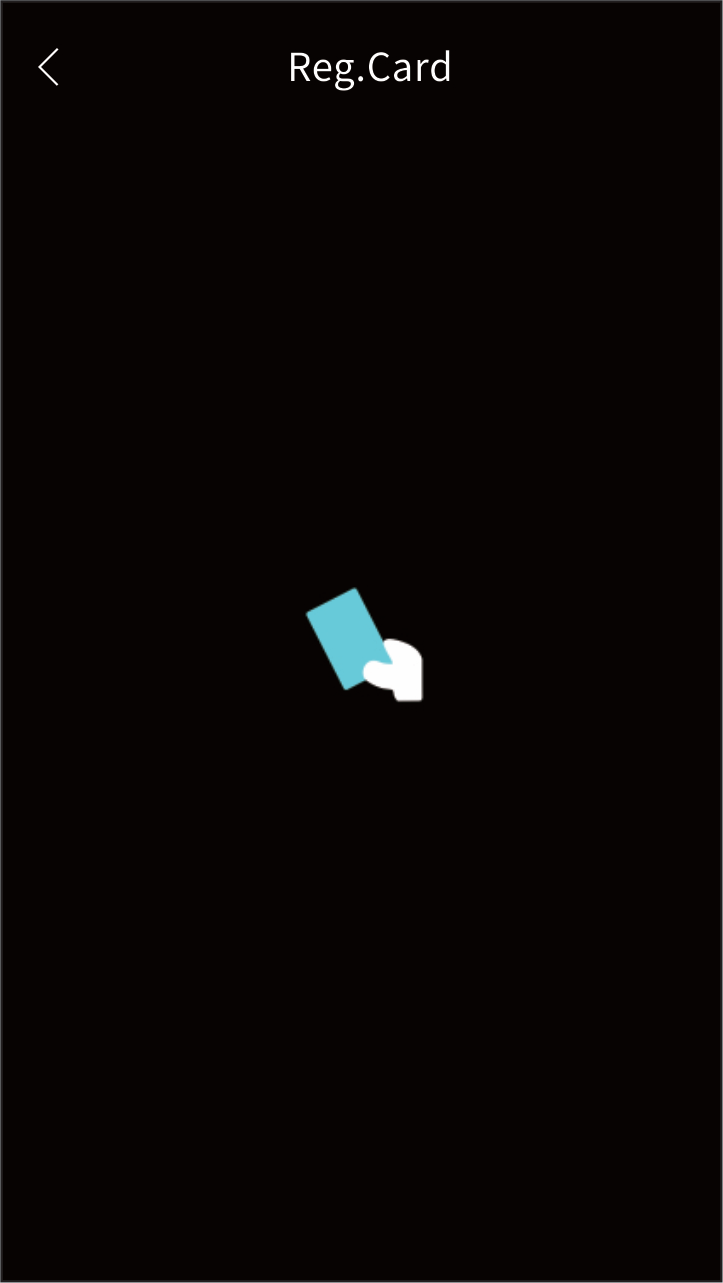
Register Card
Face access controller will recognize the card number, and click “OK”to complete card registration.
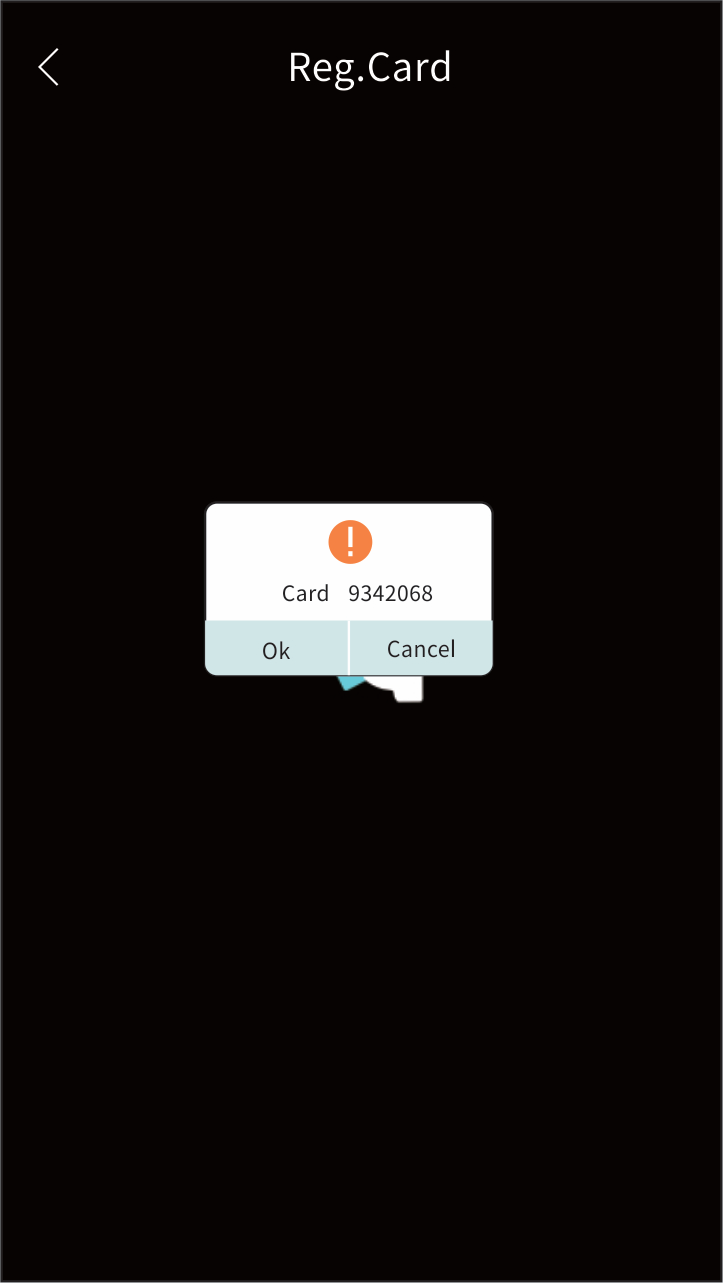
Register Card
Select “ Register Password”, and then will show the password box and numeric keypad , and enter 1-8 bits passwords and click “OK”. Enter password again, confirm the password and click “OK”, then registered successfully.
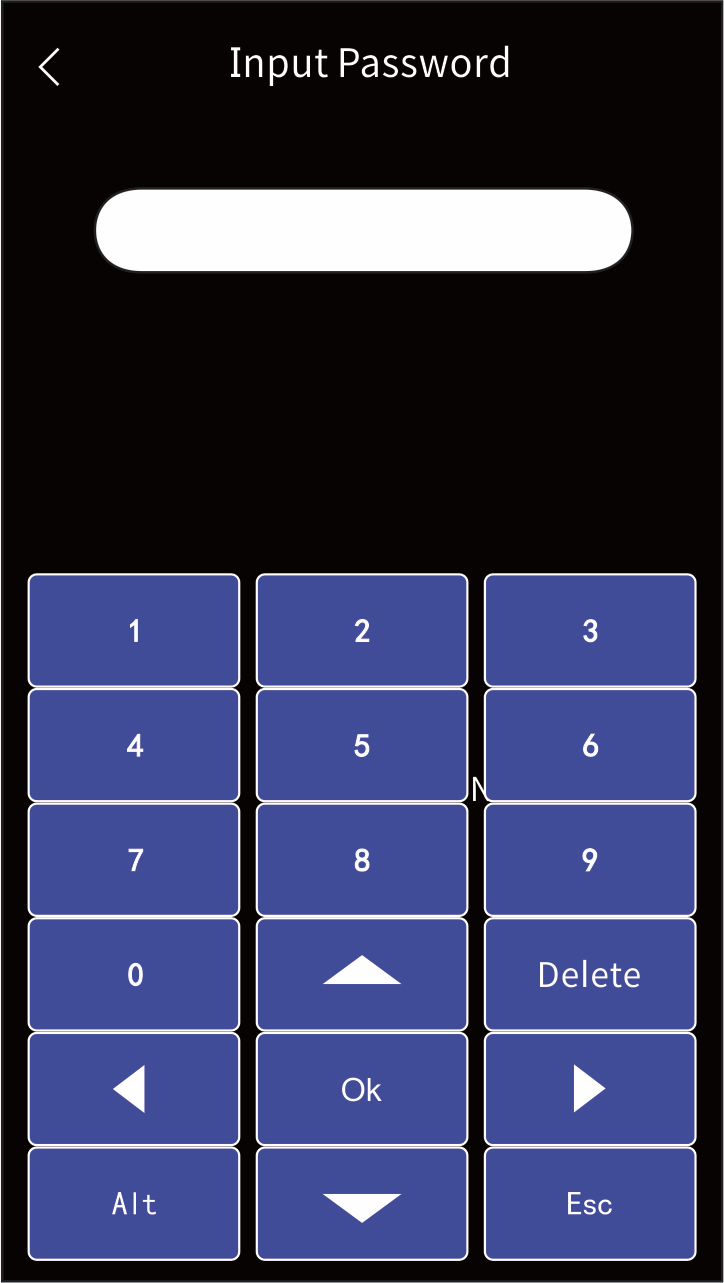
Enter password
User Browsing
Click “User Browsing” can see the registered users which are arranged by work number by default, and you can modify the registered users’ info. Can query by turning page, click on “Previous Page” and “Next Page”. Can query by work number, click “Query Work Number”, after this operation, click “OK” and you can query the corresponding work number users. Can query name, click “Query Name”, after entering the name, click “OK” to query the corresponding name users.
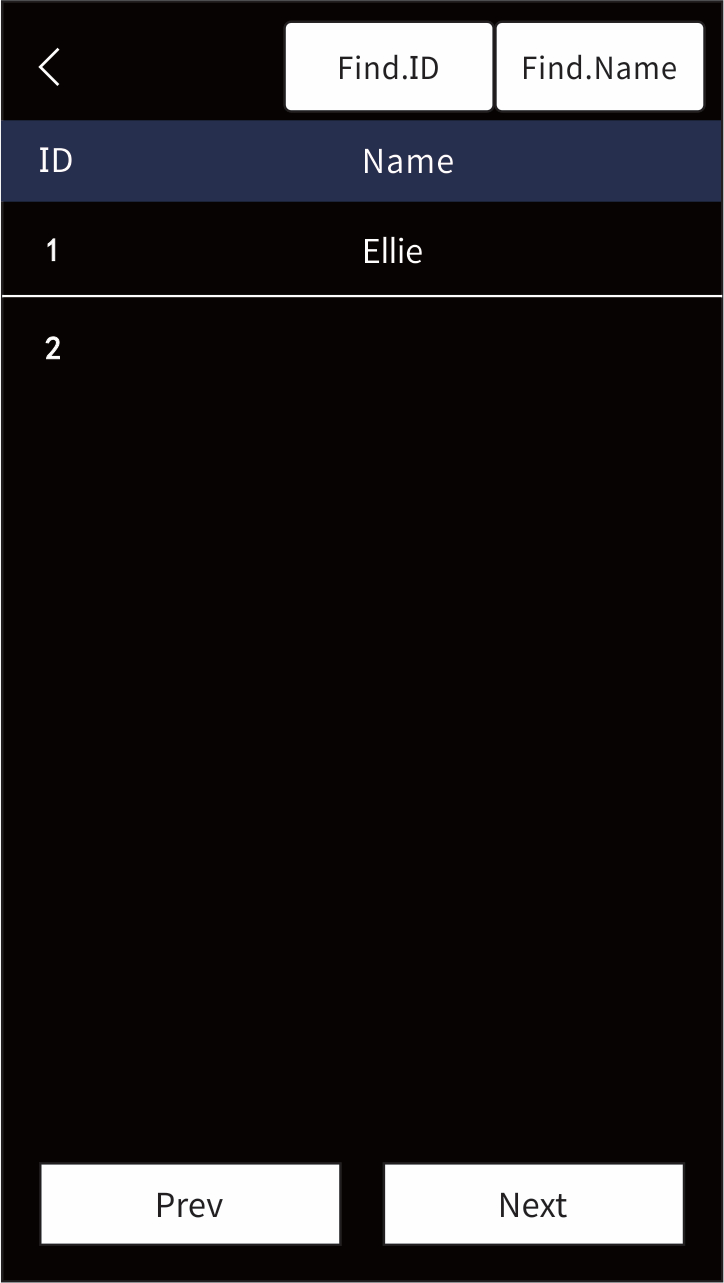
User Browsing
Query to the user that needs to be modified, click “User”, and check this user’s detail info. Can modify user name, card number, password, department, permission, and also can register the face again and delete user directly. The user can be set as an administrator by permission modification.
Department Settings
Click “Department Settings” to add department info to manage users info by department.
Registration Info Backup
Click “Registration Info Backup” to backup the info of the registered personnel to the U disk.
Restore registration info
Click “Restore” to restore the personnel info to the U disk to the face access controller
Attendance Rules
Click “Attendance Rules” to enter the attendance rules menu. Under this menu, can set the records, and modify attendance rules, and can check the records.
Attendance Rules
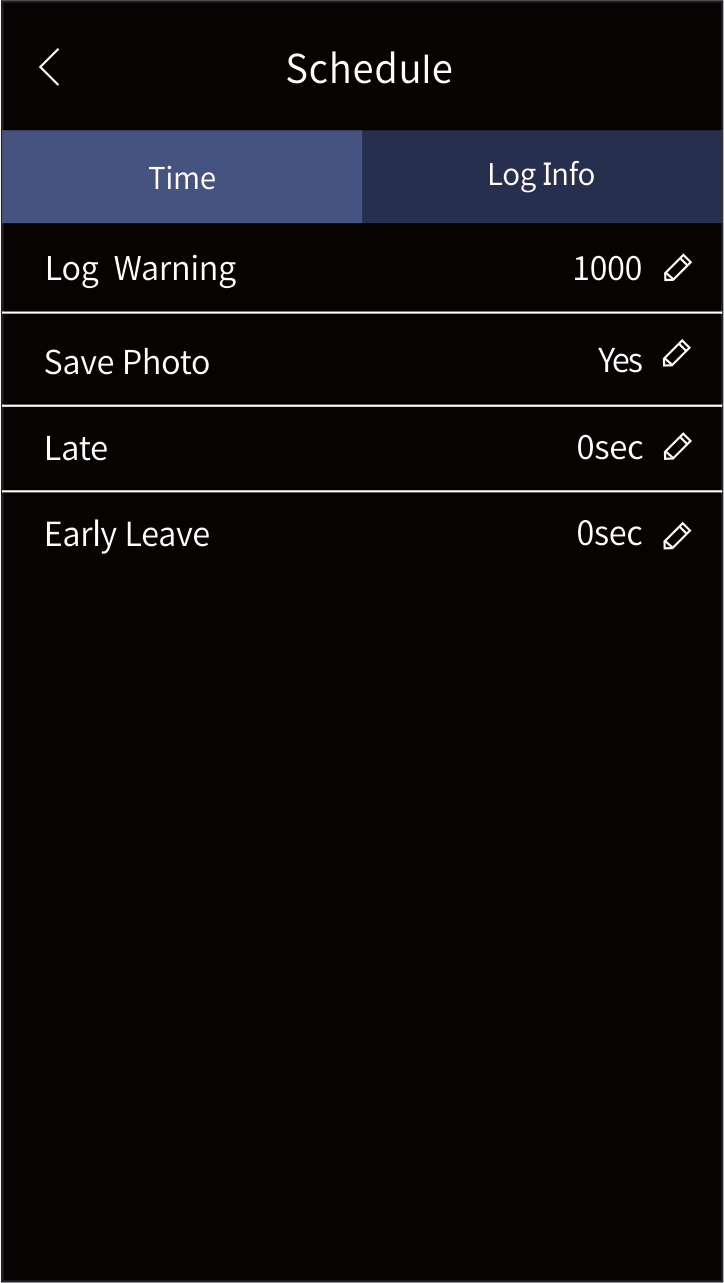
Attendance Rules
Attendance Records Warning: the storage record is about to be full, can set the number of remaining records, and the device starts to alarm (default 1000pcs). Allow late time and early leave time, up to 60 seconds.
Records Query
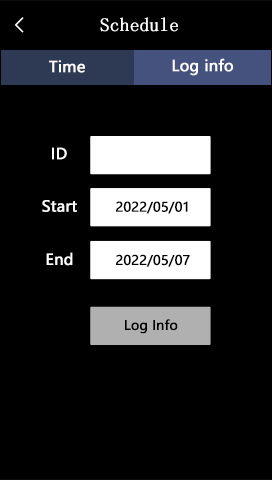
Records Query
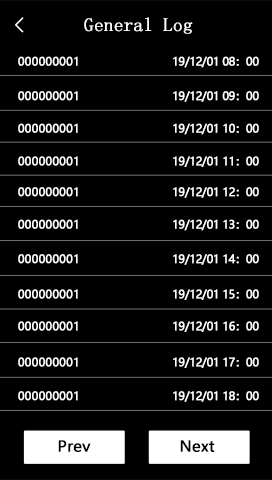
Entry&Exit Records
Enter the work number, you can query the access records from the start time to the end time.
Report Management
Click “Report Management” to enter the report management menu. You can modify the “Company Name” display in the attendance report and import and export the schedule and attendance sheet through the U disk.

Report Management
System Settings
Click “System Settings” to enter the system settings menu, which includes both general settings and advanced settings.
General Settings
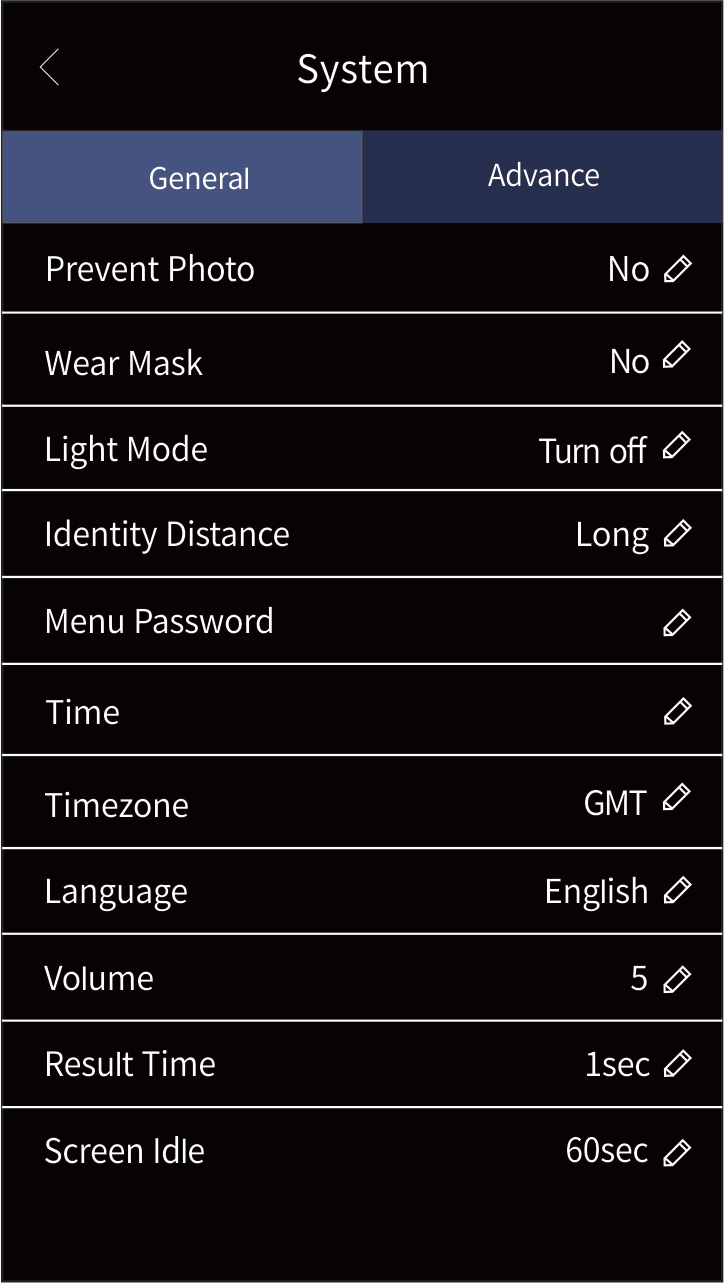
System General Settings
Can set the device functions, such as time, time zone,language, volume, interface return time, screen protection time.
Support Simplified Chinese, Traditional Chinese, English, Cantonese, Portuguese, Spanish, Russian, French, Japanese, Korean, Thai and Arabic, etc.
The maximum volume can be adjusted to 10.
The maximum return time of the interface can be set to 30 seconds (1 second by default).
Maximum screen saver time can be set to 999 seconds (default 60 seconds)
Recognition distance can be adjusted (long, middle and short).
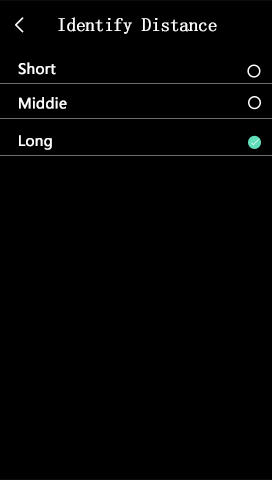
Recognition Distance
Can enable or disable liveness detection function.

Liveness Detection
Advanced Settings
Advanced Settings
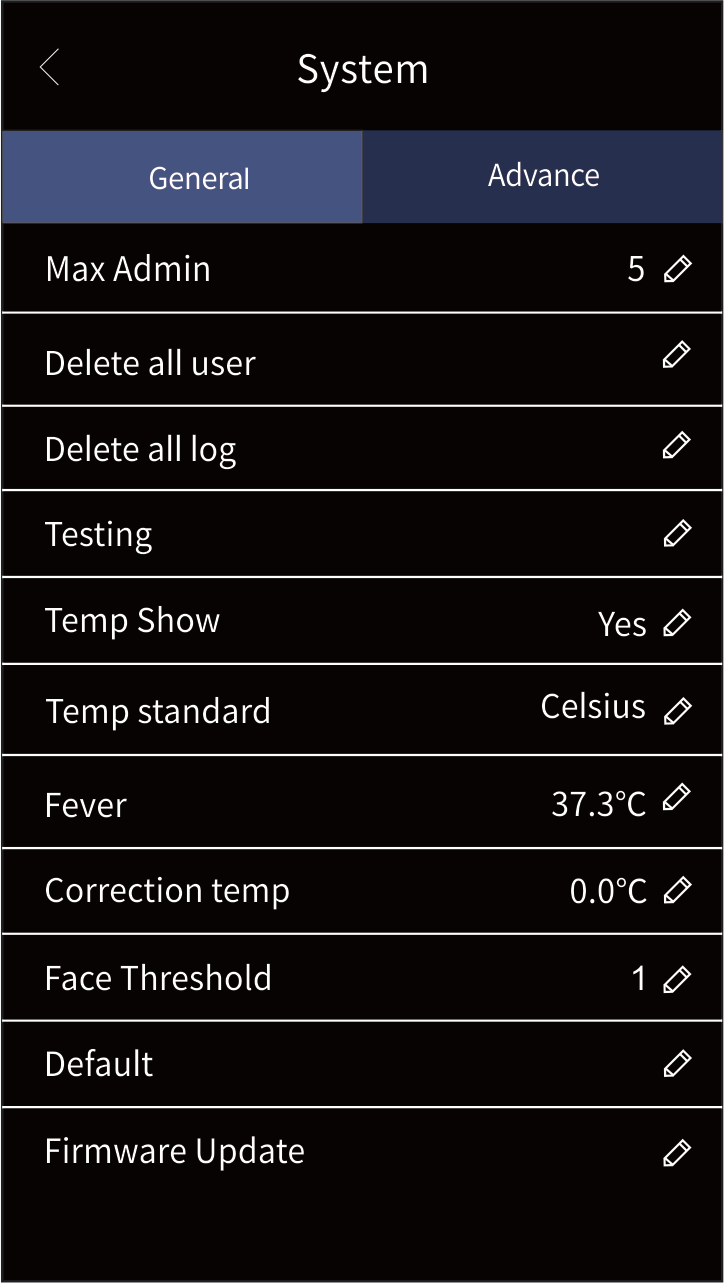
Can modify device total number of administrators, up to 255 administrators can be set.
The temperature standard can be set to Celsius or Fahrenheit.
The recognition threshold of the machine can be modified.
Support to restore the factory setting.
The firmware of the machine can be upgraded by USB flash disk.
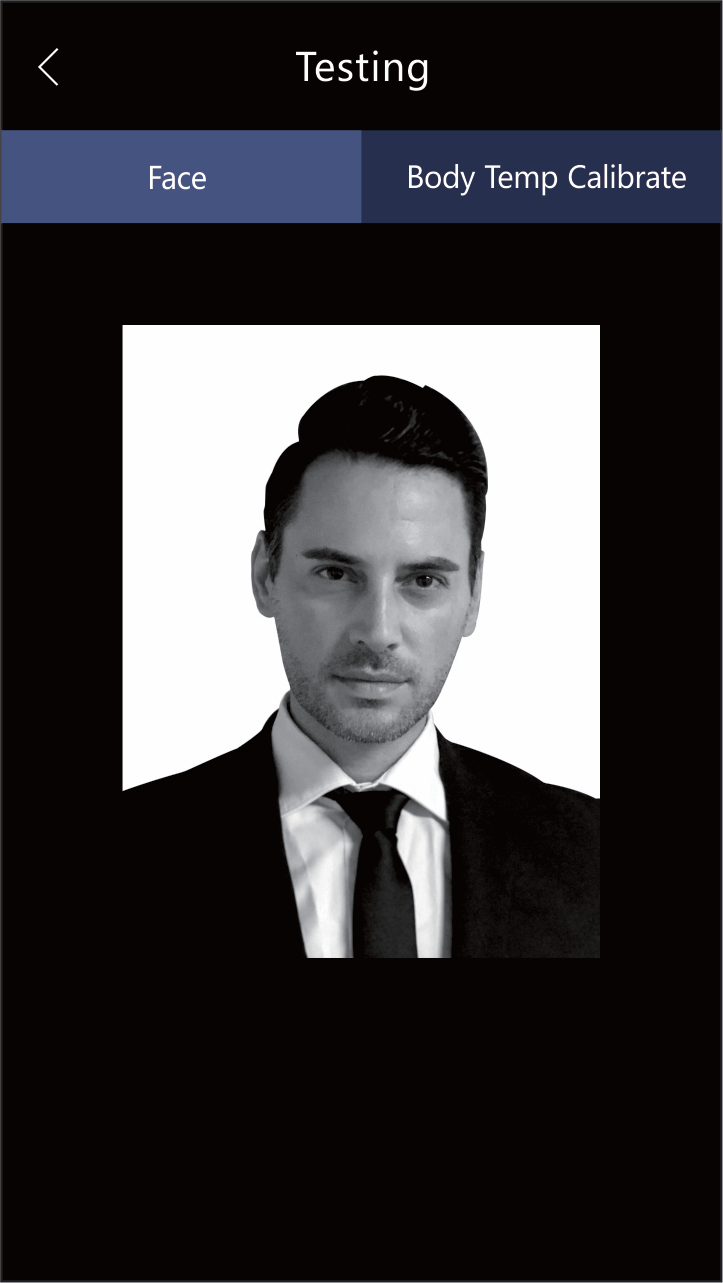
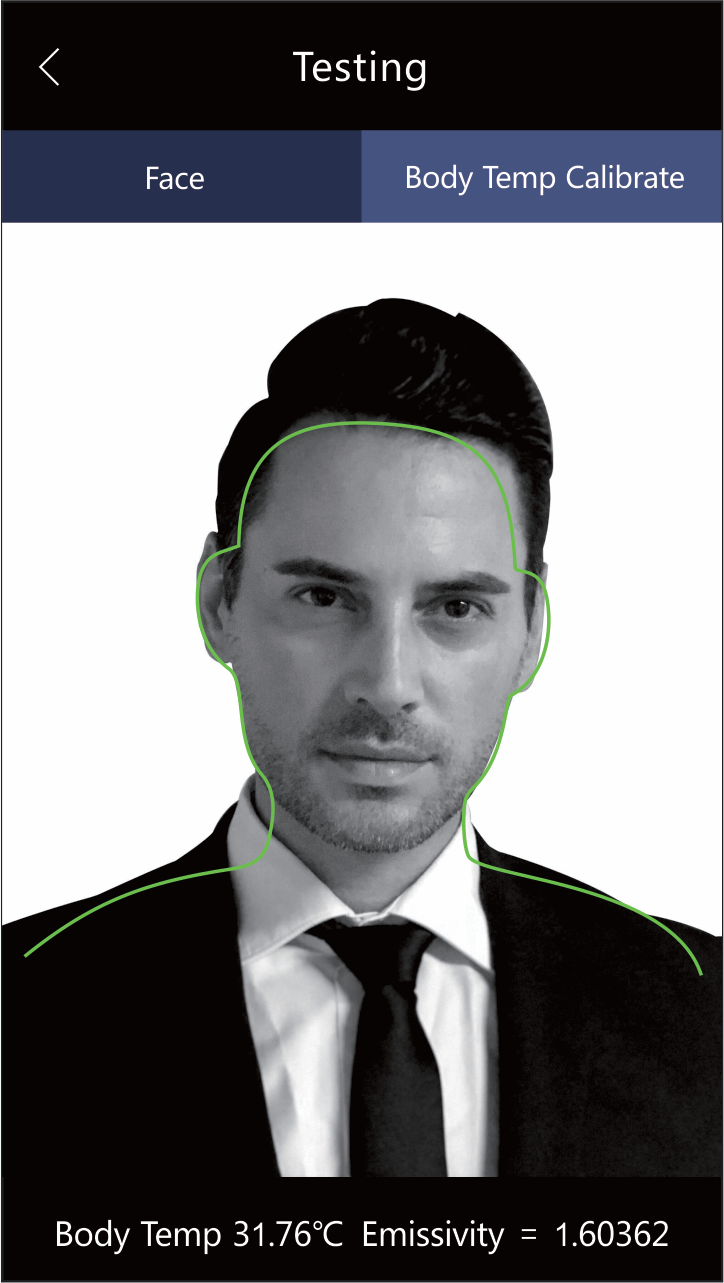
Through device self-detection function of “Calibration” to calibrate temperature detection of face device, to ensure the accurate temperature. The following 5-20 calibration (during temperature calibration, please keep the face within the identification section figure, keep 0.3~1.2 meters away from the face device, and the face device can calibrate automatically ). After calibration, it will show the calibrated temperature as shown in 5-21:
Remark: If the user needs to recognize face+temp at a long distance, it is recommended to manually adjust the temperature correction to + 0.2 degrees after automatic temperature calibration, so as to be closer to the actual body temperature.
Calibrating
Calibration Completed
Temperature Alarm Value: can modify the higher alarm value of body temperature during temperature detection.
Temperature Correction: when the recognition distance is far, the temperature during detection can be corrected.
Other Functions
Other Functions
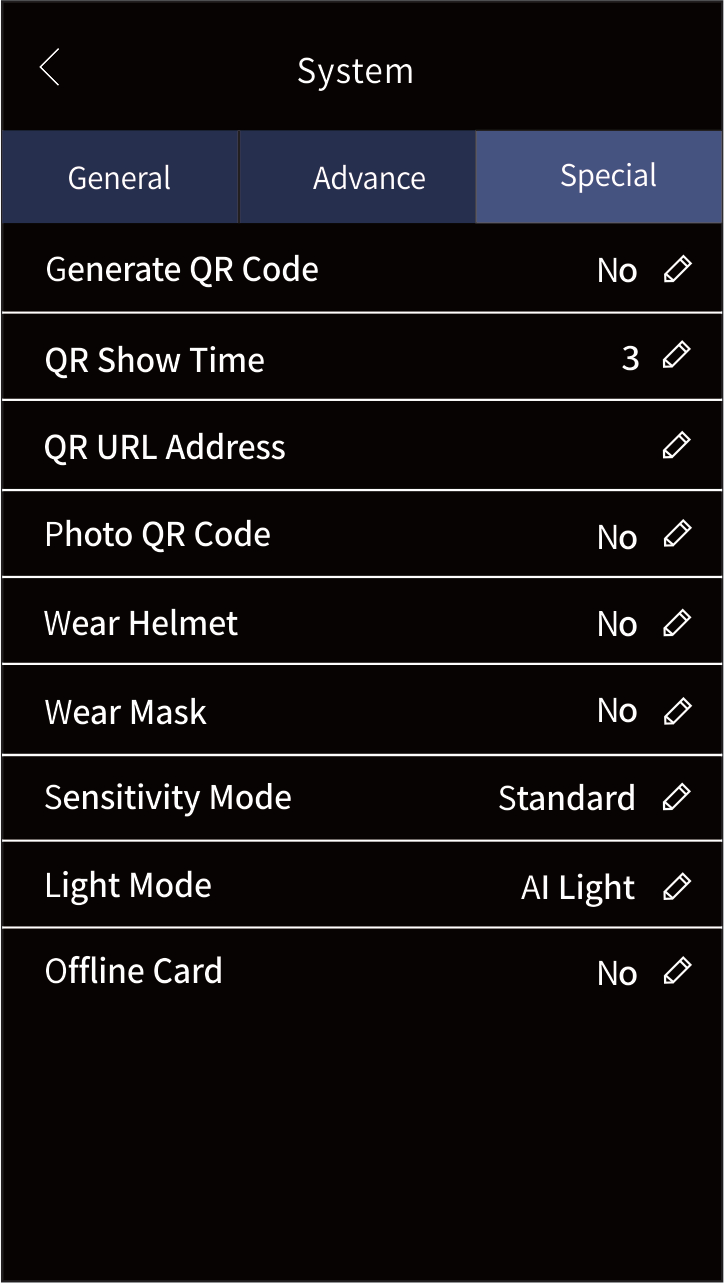
Enable QR code function: turn on/off the display of QR code (the content of the QR code is the name, body temperature, time and server URL address of the current personnel, which is mainly used on mobile phone to scan and obtain personnel information and body temperature information, so as to reporting to the epidemic supervision platform).
Stay of QR code display: used to control the display duration of QR code, unit / second (default: 3 seconds).
URL address of QR Code: it is convenient to declare personnel information and body temperature data. This URL is the server address.
Safety Helmet: the function can be turned on or off according to the user's needs. When the helmet detection function is enabled, it is detected that the user does not wear a helmet, the device screen will prompt you to wear a helmet and prohibit passage.
Save Photos: turn on/off to identify whether real-time photos are saved.
Photosensitive Mode: set the photosensitive mode of the camera, which can be adjusted to brighten or darken according to the current environment.
Fill Light Mode: the fill light can be set to three modes: normally light/standard/automatic. When it is set to automatic mode, it will automatically light up when someone recognizes it and turn off when no one recognizes it.
Door Setup
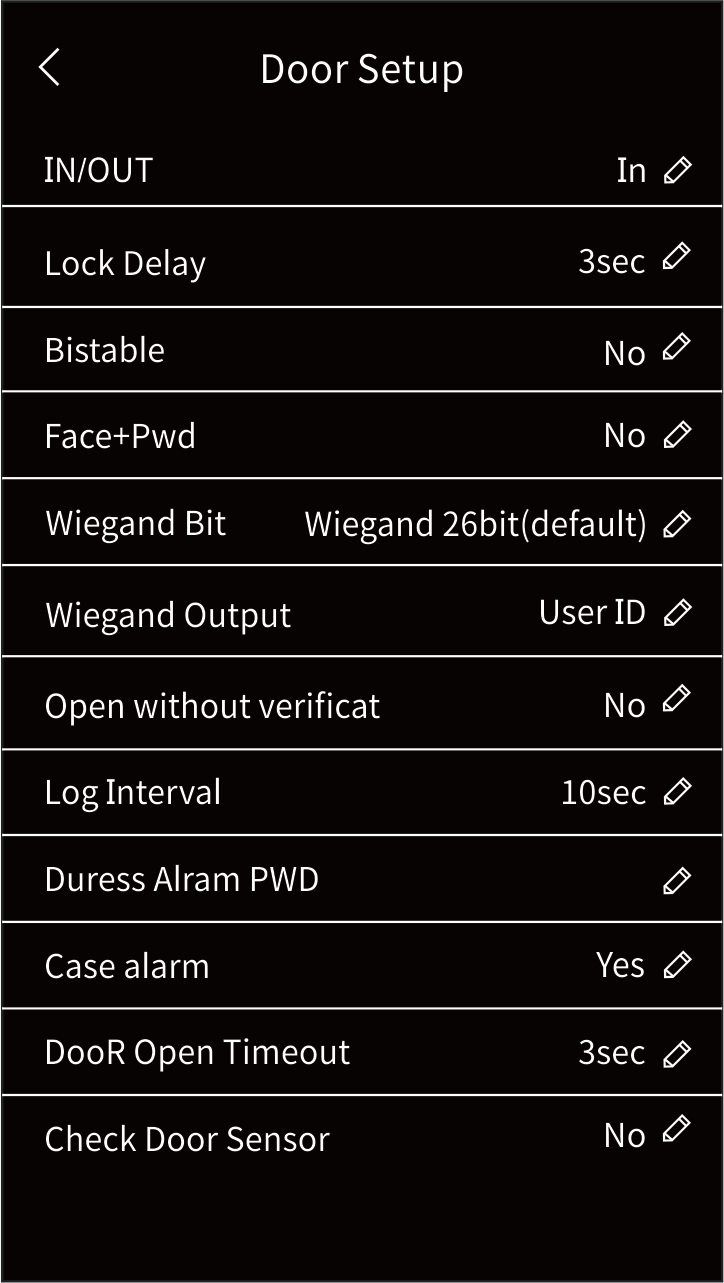
Click “Door Setup”in the menu,and enter it, as shown in 5-22
Door Setup
Entry and Exit Type: can select the type as in and out.

Setting Interface
The unlocking holding time can be set to 0~65535 seconds. (0 represents 0.5 seconds, and 65535 represents the normally open during verification passes)
Can enable or disable the bistable mode (enable bistable function:legal identification once open, and then legal identification a time to close, switch to open or close the door)
WG output content can be modified work number or card number.
The number of WG bytes can be modified to Wiegand 26 (2 bytes, 3 bytes), Wiegand 34 (4 bytes), Wiegand 66 (8 bytes).
Alarm settings include duress alarm, tamper alarm, door timeout alarm and door sensor alarm.
Bell Settings
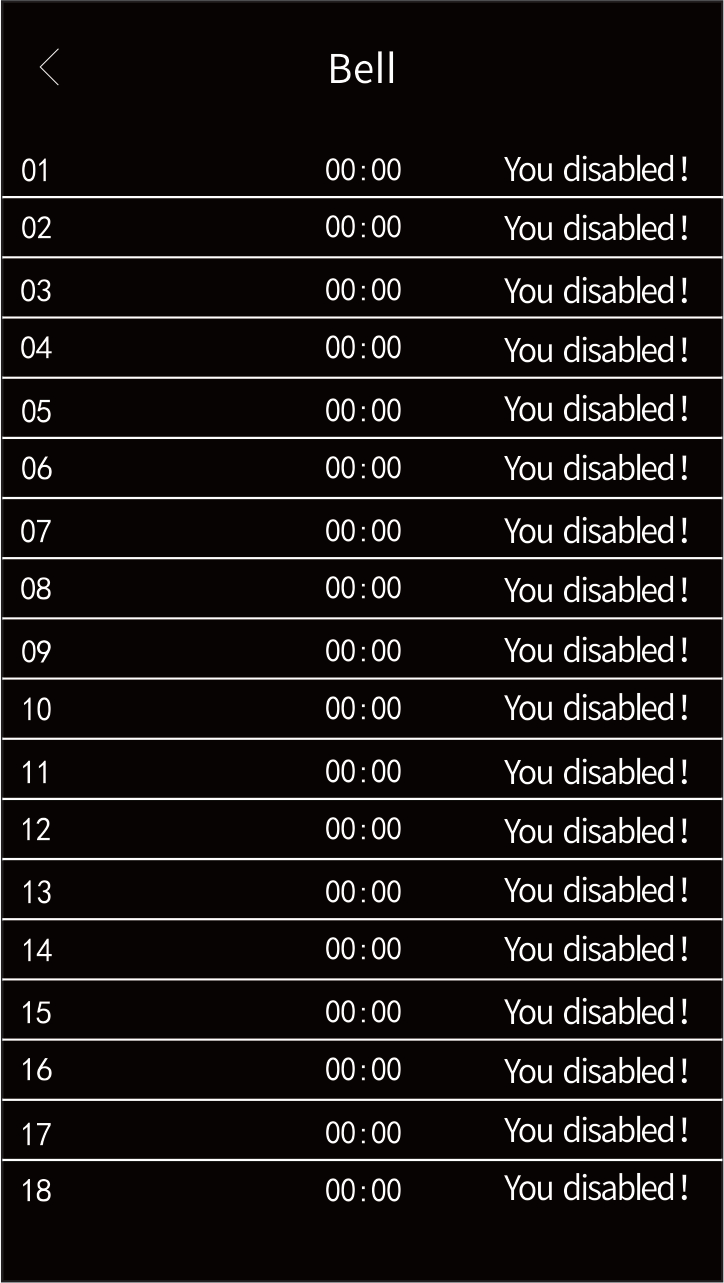
Click the“Bell Settings”, and enter it. Can set 24 groups. Click the“Time”can set the bell time. Click “Disable” can set the duration time (0 second represents “Disable” status, and up to 255 seconds can be set. ) As shown in 5-24:
Bell Settings
Communication Settings
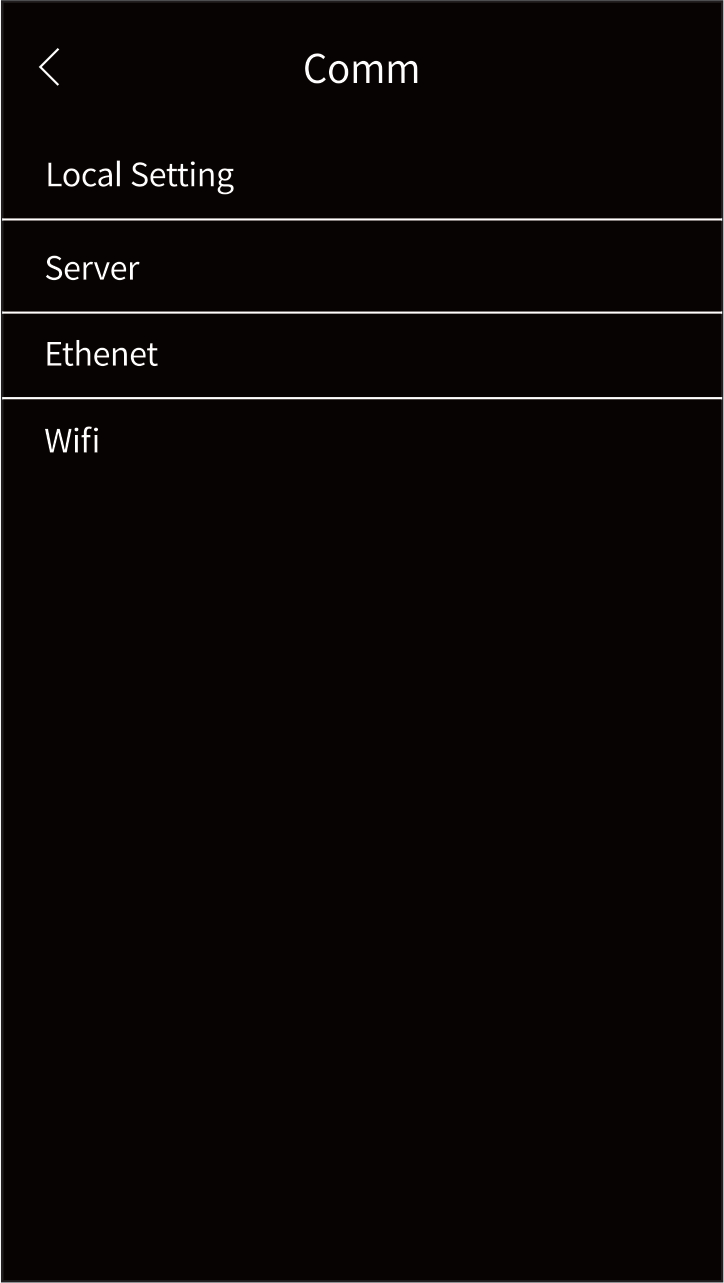
Click “Communication Settings” in the menu. Can modify the communication parameter, server settings and wire settings of the device. As shown in 5-25:
Communication Settings
Local Settings: can modify the device port number (default 8101) and device communication password. As shown in below.

Communication Settings
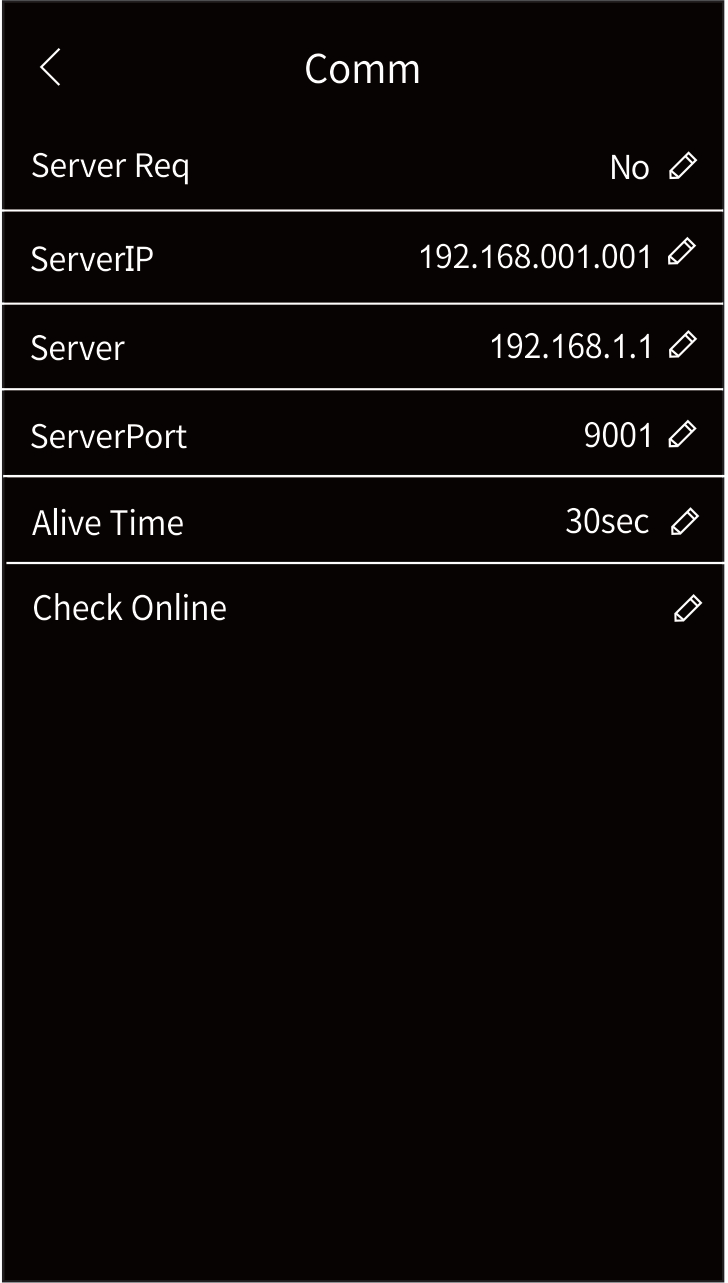
Server Settings: when the face machine is installed through the one-card system software and select the real-time monitoring. The software will fill in automatically, as shown in below
Server Communication Settings
Wire (Wireless) Settings: can select to enable or disable DHCP function (disable by default), and you can modify the TCP parameters. The default IP address is 192.168.1.150. The default subnet mask is 255.255.255.000
The default gateway is 192.168.1.1; DNS server IP is 192.168.1.1 by default; The MAC address is fixed and unique, as shown in below.
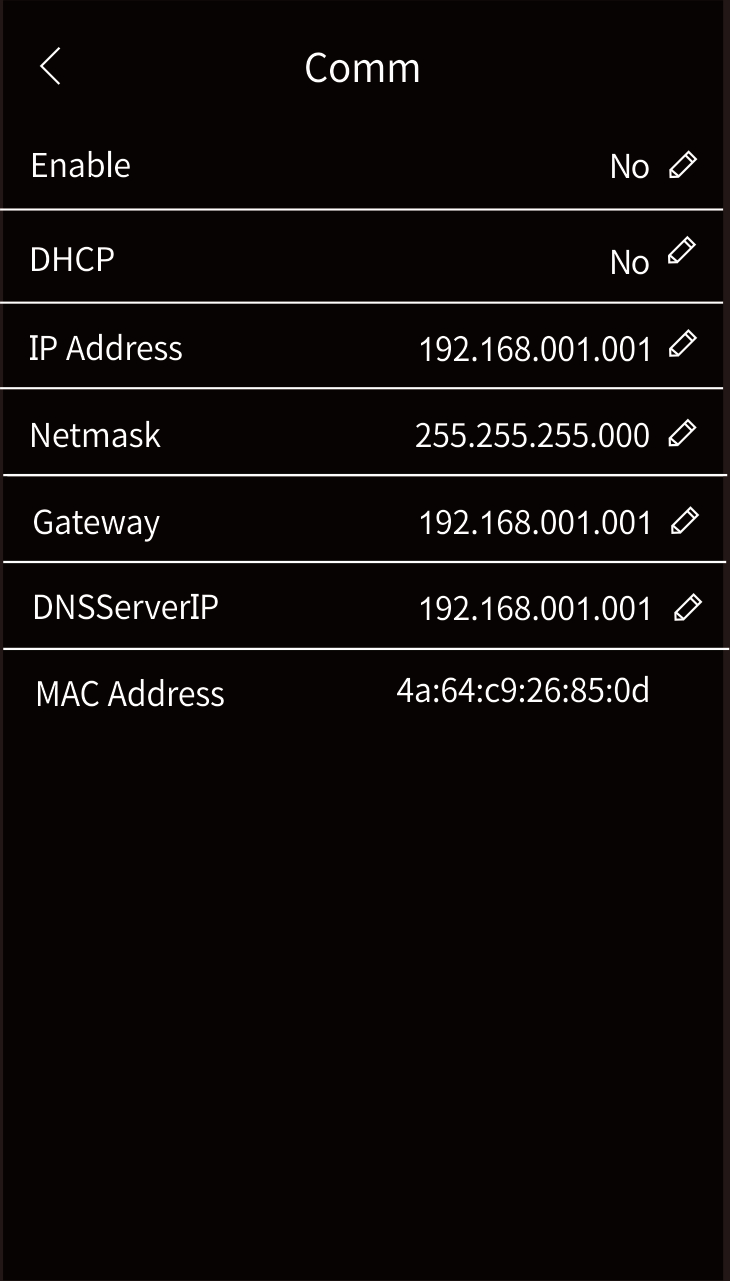
Server Communication Settings
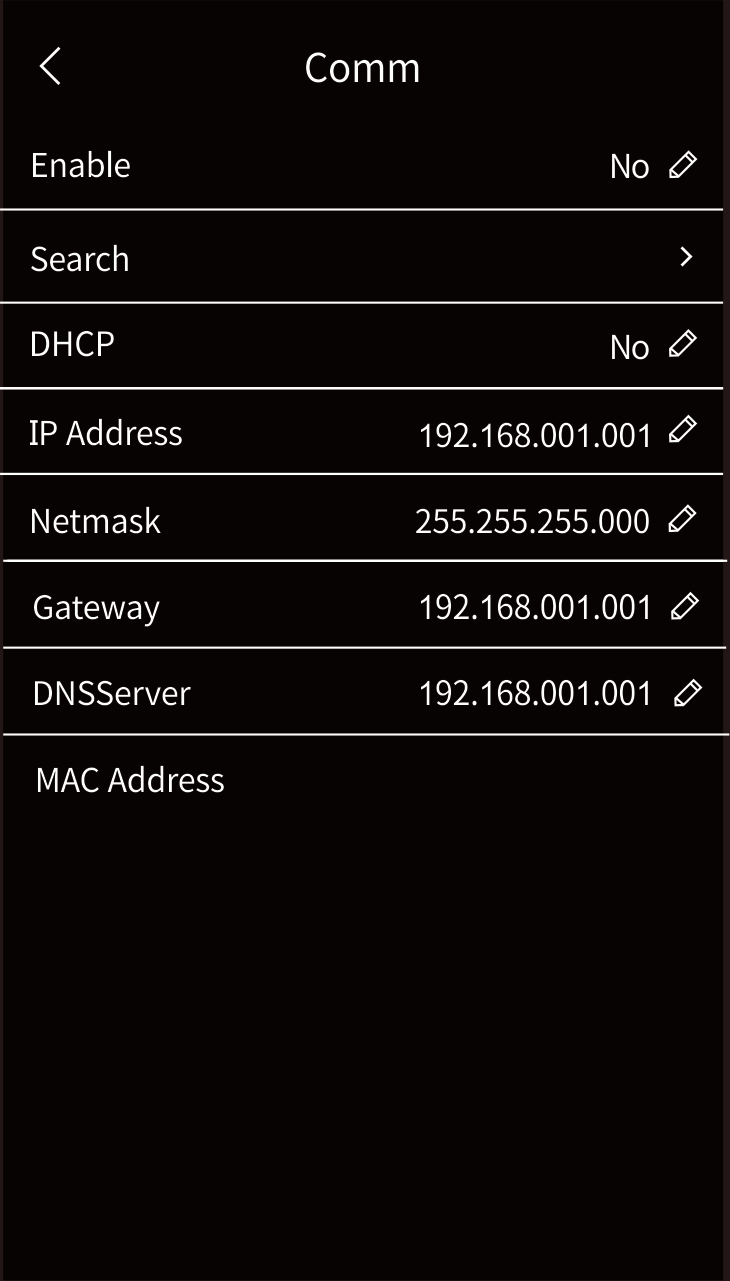
Communication Settings
Info Query
Click “Info Query”in the menu, and can query the face device registration info and device info.
Registration info includes the registration number management, user registration number, password registration number, card registration number, records number and saved photos number. The number on the left represents the amount of info already in the device.The number on the right represents the maximum capacity of the device registration info.As shown in below:
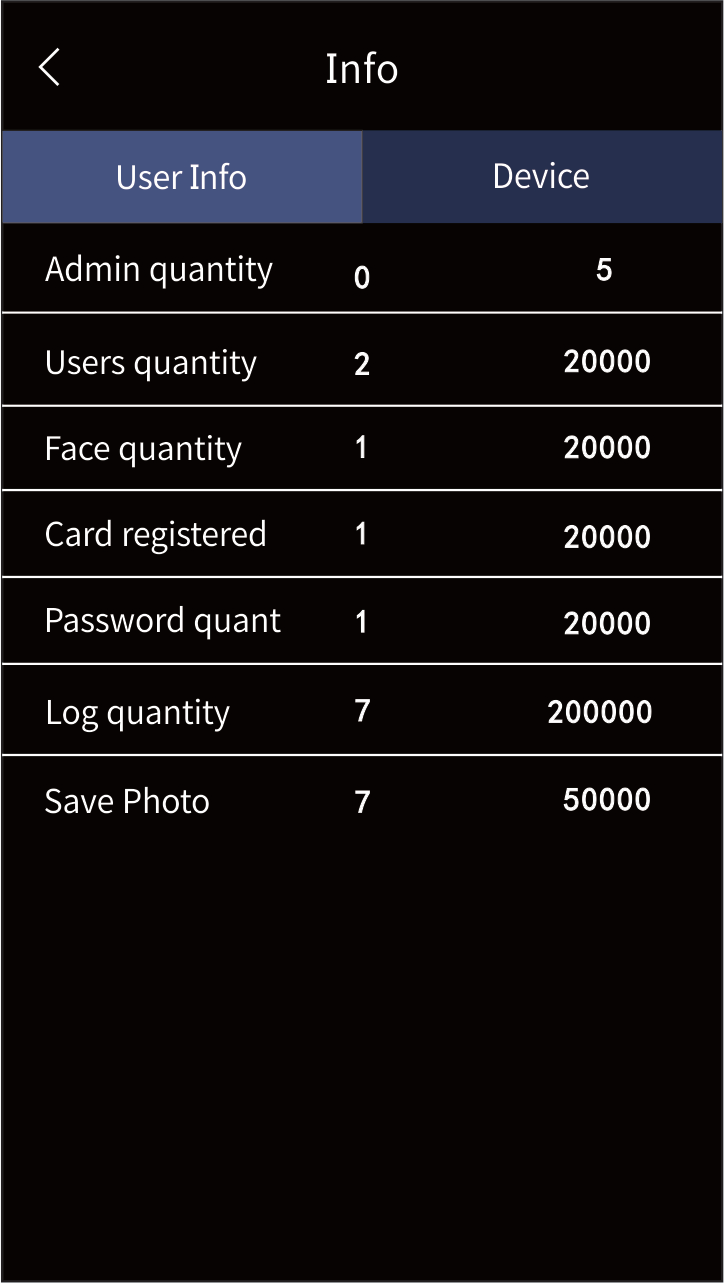
Info Query
Device info includes manufacturer, website, device name, manufacture date, serial number, algorithm version, firmware version and so on. As shown in below:
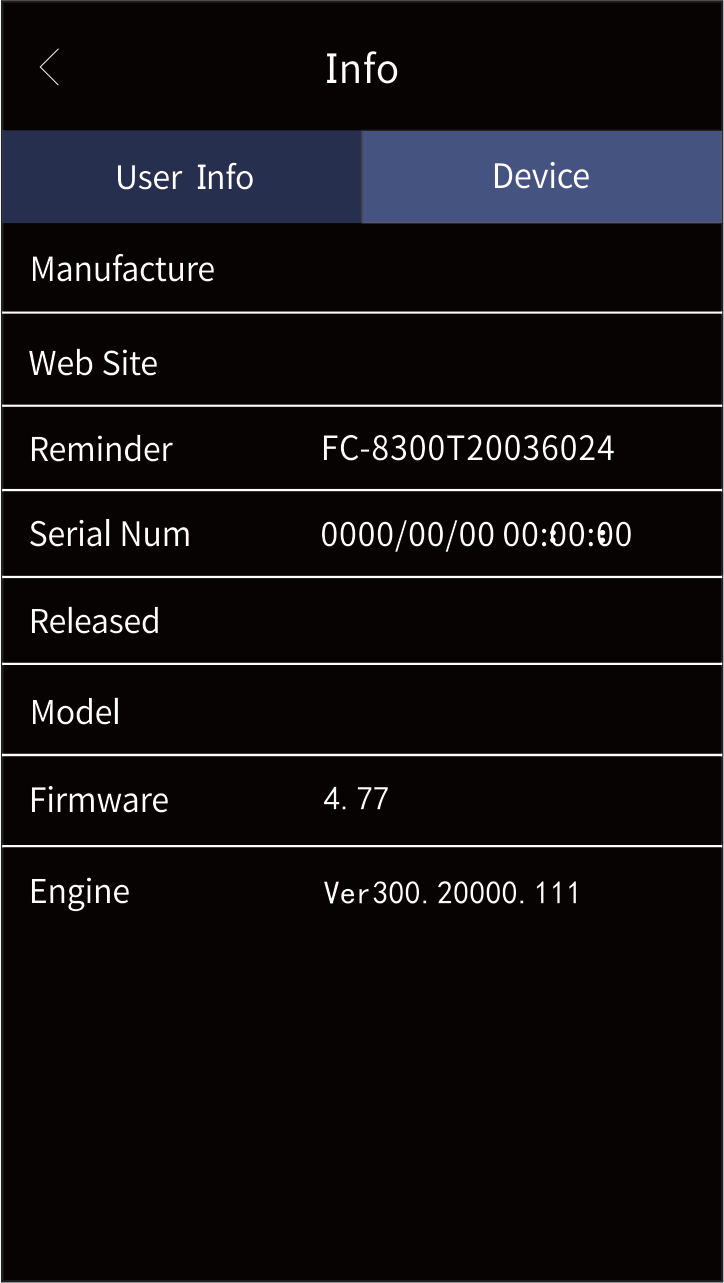
Info Query
Client Operation Instruction
Face Access Controller Installation And Settings
Can auto search online device through auto-search. It is convenient for the devices to join the software system. Click“Device Install”- “Auto Search”. As shown in Figure6-1:
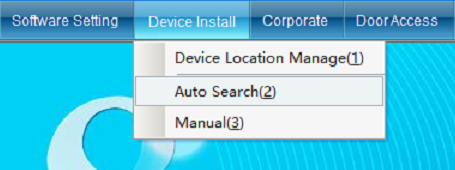
Click“Auto Search”, will enter Figure 6-2:
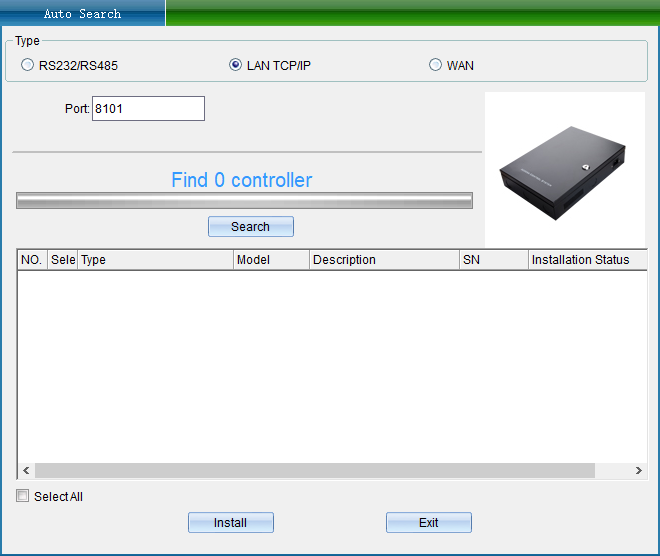
TCP/IP LAN mode: enter the network port first, and the default is 8101, and click “Search”. (Note: device need to communicate with the computer through switcher.) As shown in Figure6-3:

If your device is TCP/IP communication and you need to modify the device's IP address. (When installing the device, the user needs to change the IP address of the device and needs to check the communication password of the device. If the device has changed the communication password, then you need to enter the correct password to allow the change of IP address to prevent other people through the installation of software to change the device IP leading to the original user's communication breakdown.) You can double-click the TCP/IP face access controller, and the interface of TCP connection parameters will pop up (As shown in Figure6-4).
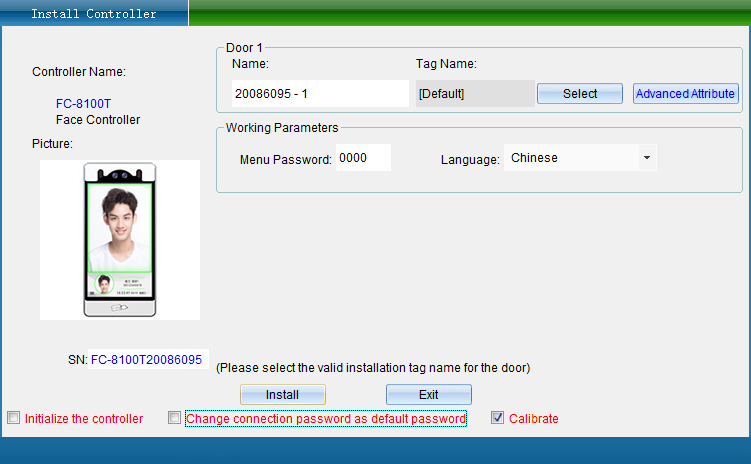
(Note: this system can search the face access controller which are in different network segment with the local computer. You need to modify the IP address with the same network segment address of the computer before normal communication. If the router you use supports multi-segment mapping, the system software can directly communicate with the access control controller of other segments)
Double-click the IP address, subnet mask and gateway address to change it into parameters matching the computer IP or LAN segment, click“Save”to return to the installation interface, and then click“Install”. After installing the device, click the device property, and the following picture pops up. (As shown in Figure6-5)
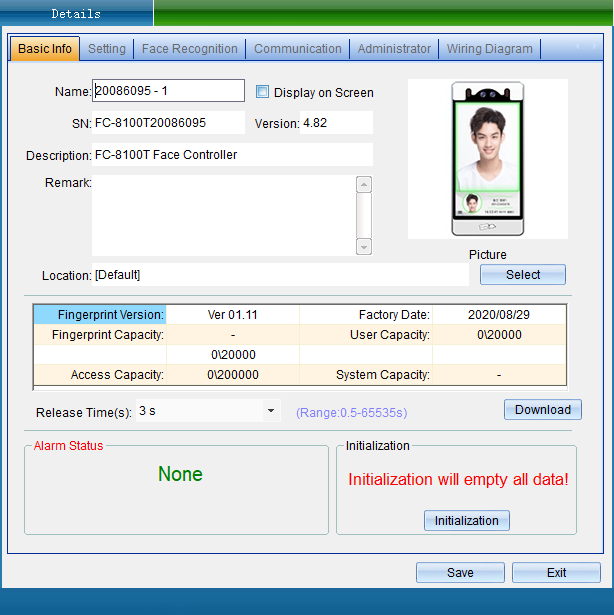
Name can be modified according to requirements.
Unlock Holding Time: can adjust according to requirements (default: 3 seconds)
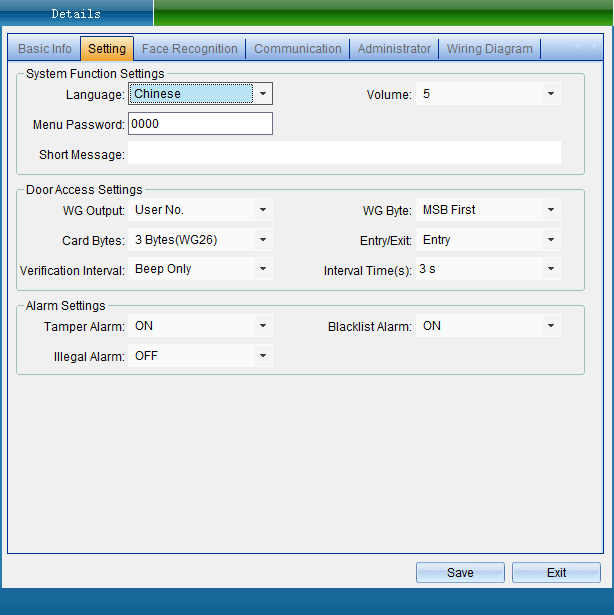
Select“ ”in the “ ”can modify the face access Setting Details controller“Menu Password”,“Recognition Distance”,“Bioassay Mode Entry and Exit Type Swiping Card Bytes WG Output ”,“ ”,“ ”,“ ”, “Sub-machine and host machine”, etc. (As shown in Figure6-6)
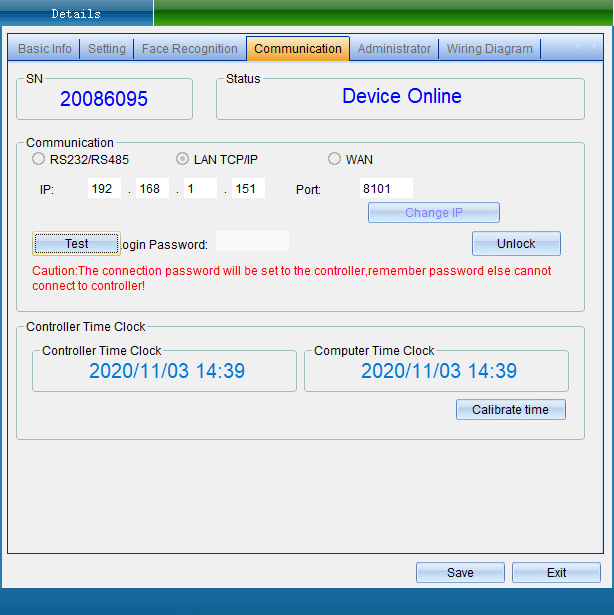
Select “communication Parameters” in the “Equipment Details”, as shown in the figure below
Add face and authorize Add face and authorize
In the“Enterprise Info” - > “Personnel File”, as shown in the following figure
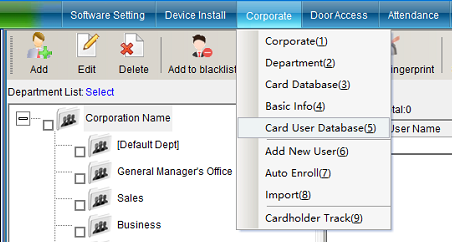
Click the personnel file to enter, as shown in the following figure:

Click the add personnel icon in the toolbar to enter the personnel modification interface, as shown in the following figure:
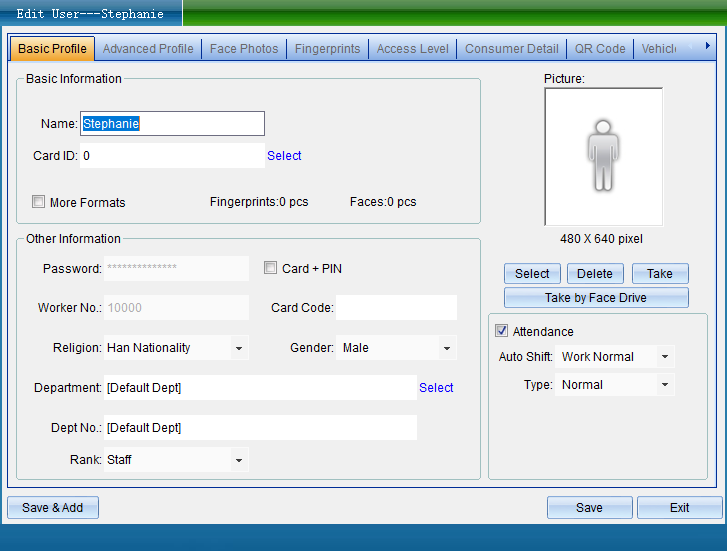
After filling in the personal information, please click to select photos, add local computer photos as personnel photos, and then click save.
Note: the photo requires a resolution of more than 480 * 640 (file size: < 300KB), clear and unobstructed face photos (without glasses, masks and hats), regular and natural color photos.
This can also be connected the photographing device (traditional USB computer camera) .It takes photos directly and saves them. Click "take photos" to pop up the following page. (Note: the face needs to be aligned with the prompt outline before the Photo button is displayed)
Click to take photos. After taking photos, you will return to the personnel page, edit the data and click save.
For authorization of door opening authority, click “Set Door Opening Authorization” in the drop-down menu of “Access Control Information” of the software. Click “Set Door Opening Authorization” to enter the interface, as shown in the following figure:
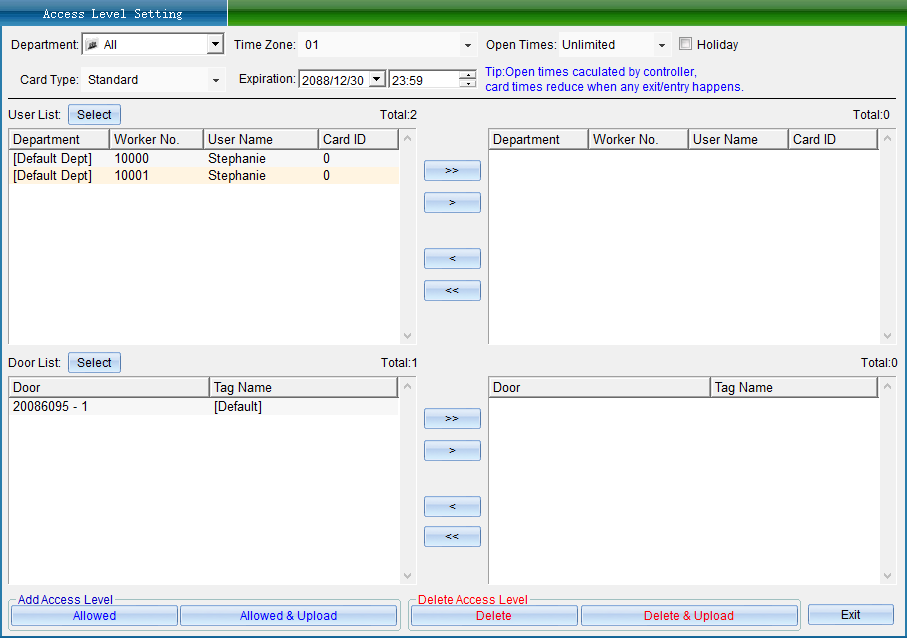
Select the person who needs to set the access control authority, select the opening period and times, the validity period, and select the equipment door. After selecting, click “allow the selected person to pass through the selected door and upload”.
Select “All Users”or “All Optional Doors”.
Select a “Single User” or a “Single Optional Door”.
Remove a “Single Selected User” or a “Single Selected Door”.
“prohibit the selected personnel from passing through the selected door” delete the access permission of the selected user to the selected door. After that, you must synchronize the data to the face machine, and the deleted permission can take effect.
“allow selected personnel to pass through the selected door” add the access permission of the selected user to the selected door. After that, the added permission can only take effect after synchronizing the data to the face machine.
“allow selected personnel to pass through the selected door and upload” add the access authority of the selected user to the selected door, and upload the added information to the face machine.
After all permissions are set, the information will not take effect until it is uploaded to the face machine.
Face Machine Record Collection And Viewing
Face machine record collection
The system has memory storage function, and each face machine can store records offline (even if it is not connected to the computer, it also will store automatically, and the records will never be lost after power failure.) You can choose the appropriate time to extract the data into the computer.
Click the “Access Control Information” drop-down menu “Collect Access Records” of the software, as shown in the following figure:
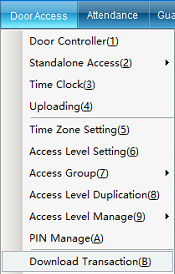
Click “Acquisition Access Record” to enter the interface ,as shown in the following figure:
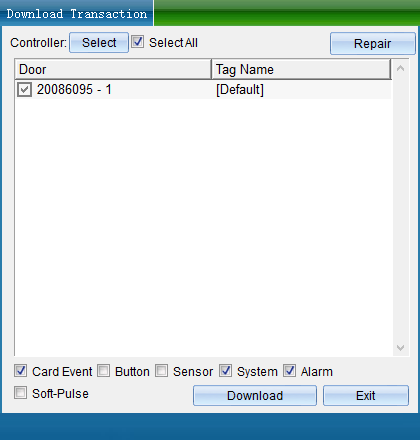
After selecting the face machine and record type to be collected, click “Collect Records of the Selected Equipment” to pop up the window, as shown in the following figure:
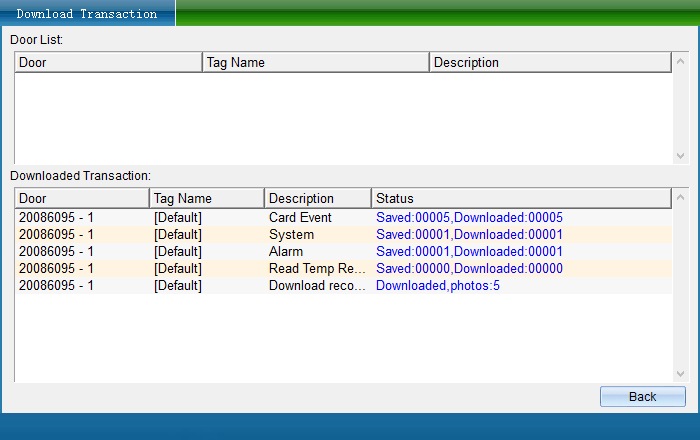
After the collection is completed, click “Finish”。
If you have collected card reading records before, you can retrieve all records through 'Repair Records'.
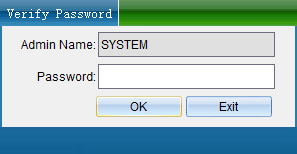
Click “Repair Record” in the “Acquisition Access Record” interface of the software “Access Control Information” drop-down menu to pop up the verification window, enter the verification password: 0000 (default administrator password), and then click “OK”, as shown in the following figure:
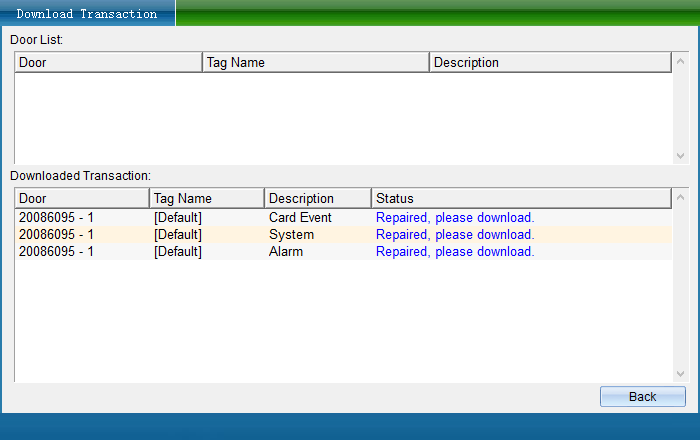
After the repair is completed, click “Finish” to return to the acquisition access control record interface, select the door to extract the card reading record and the data to be collected, then click “ ”and wait a moment to complete the acquisition. At this time, all the records in the controller are collected into the computer, as shown in the following figure:
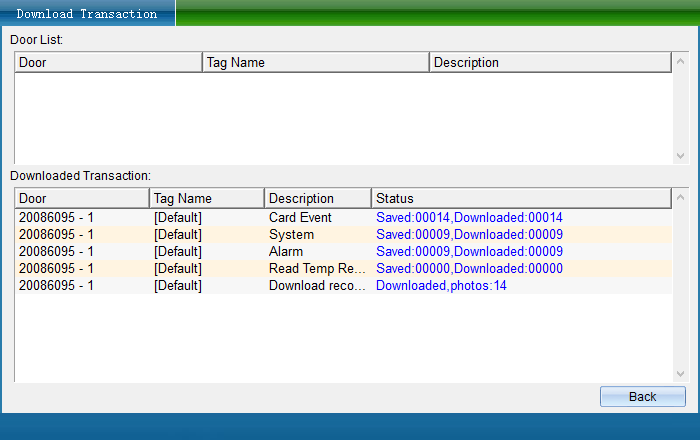
When the acquisition is completed, click “Finish”. After the records are collected, the query can be carried out.
Face Machine Record Viewing
Please collect records before querying.
Click “Access Control Information” drop-down menu “View Access Record” in the software menu bar, as shown in the following figure:
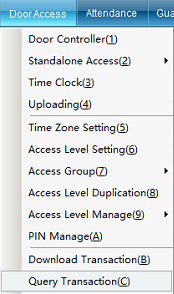
Click “Enter And Exit Record ”, as shown in the following figure:
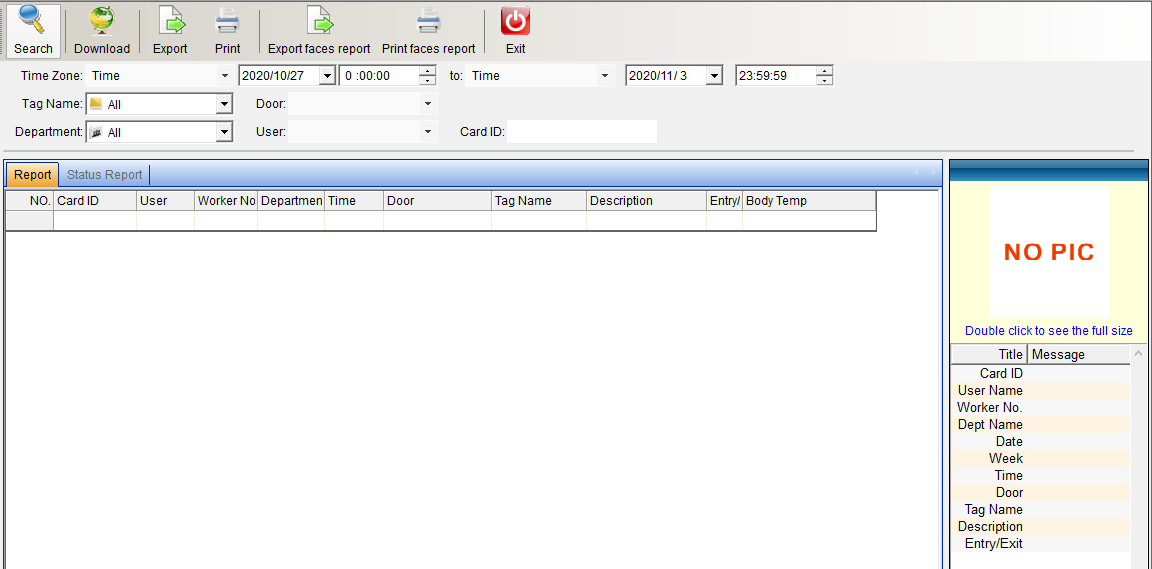
Collect records firstly, click “Collect Records”. After collecting records, you can query as needed and enter query criteria. Query criteria can query relevant records according to “Time Range”, “Name”, “Card Number”, “Department” and “Place”. Then click “Search” to query the access records of relevant personnel, or directly click “search”to query the access conditions of all people, As shown in the figure below:
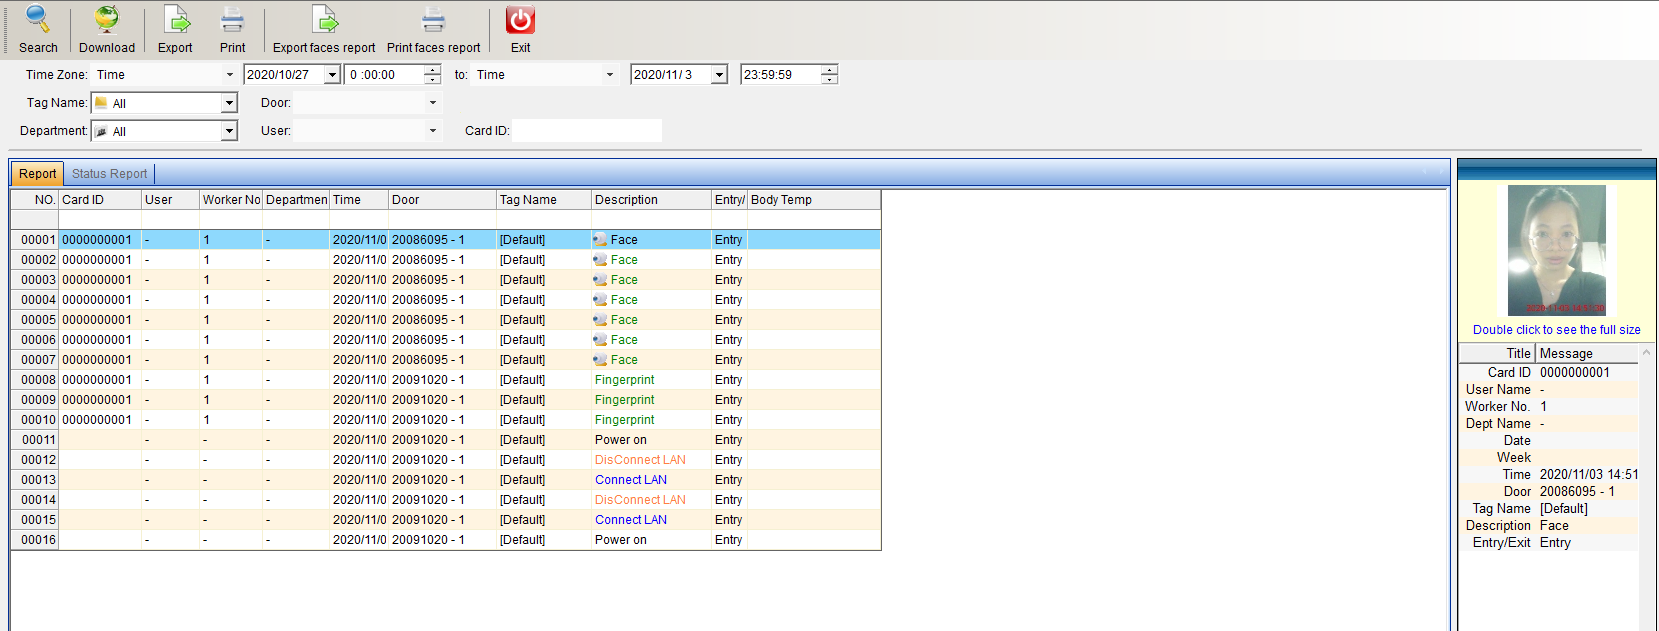
You can also export the queried records. Click “Export” to export personnel access records
Cloud System Operation Instructions
Install Face Machine
Firstly set the communication parameters of the face machine, select “Communication Settings” under the main menu of the face machine equipment, and then select “Server Settings” to set the corresponding parameters. The reference settings are shown in the following figure:
After configuring the parameters, click to test the connection and prompt “Success”, indicating that the connection is normal. PC search website: www .Access control cloud COM, log in to the cloud platform account of the all-in-one card management platform, as shown in the figure below:
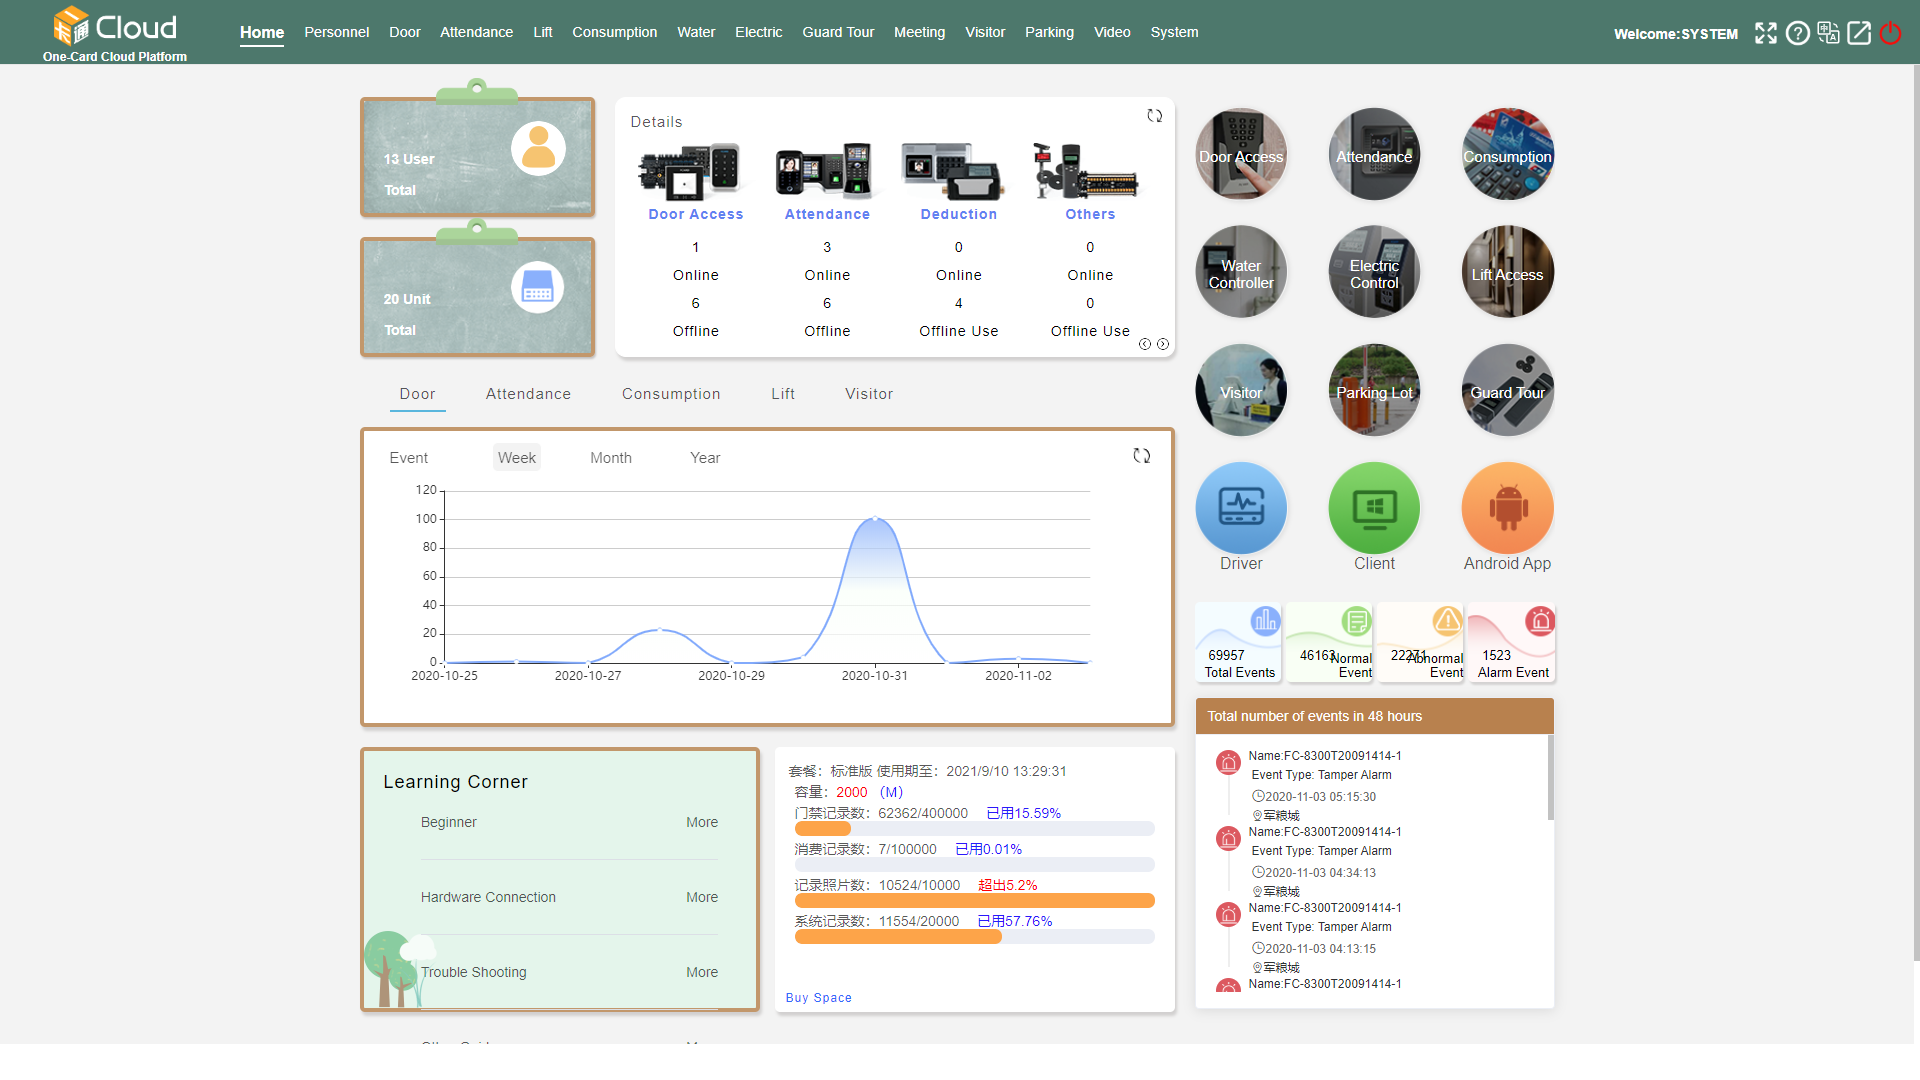
Click “Access Control” - “Installation” in the directory bar to open the interface, enter the SN code of the equipment to be installed and click OK, as shown in the following figure:
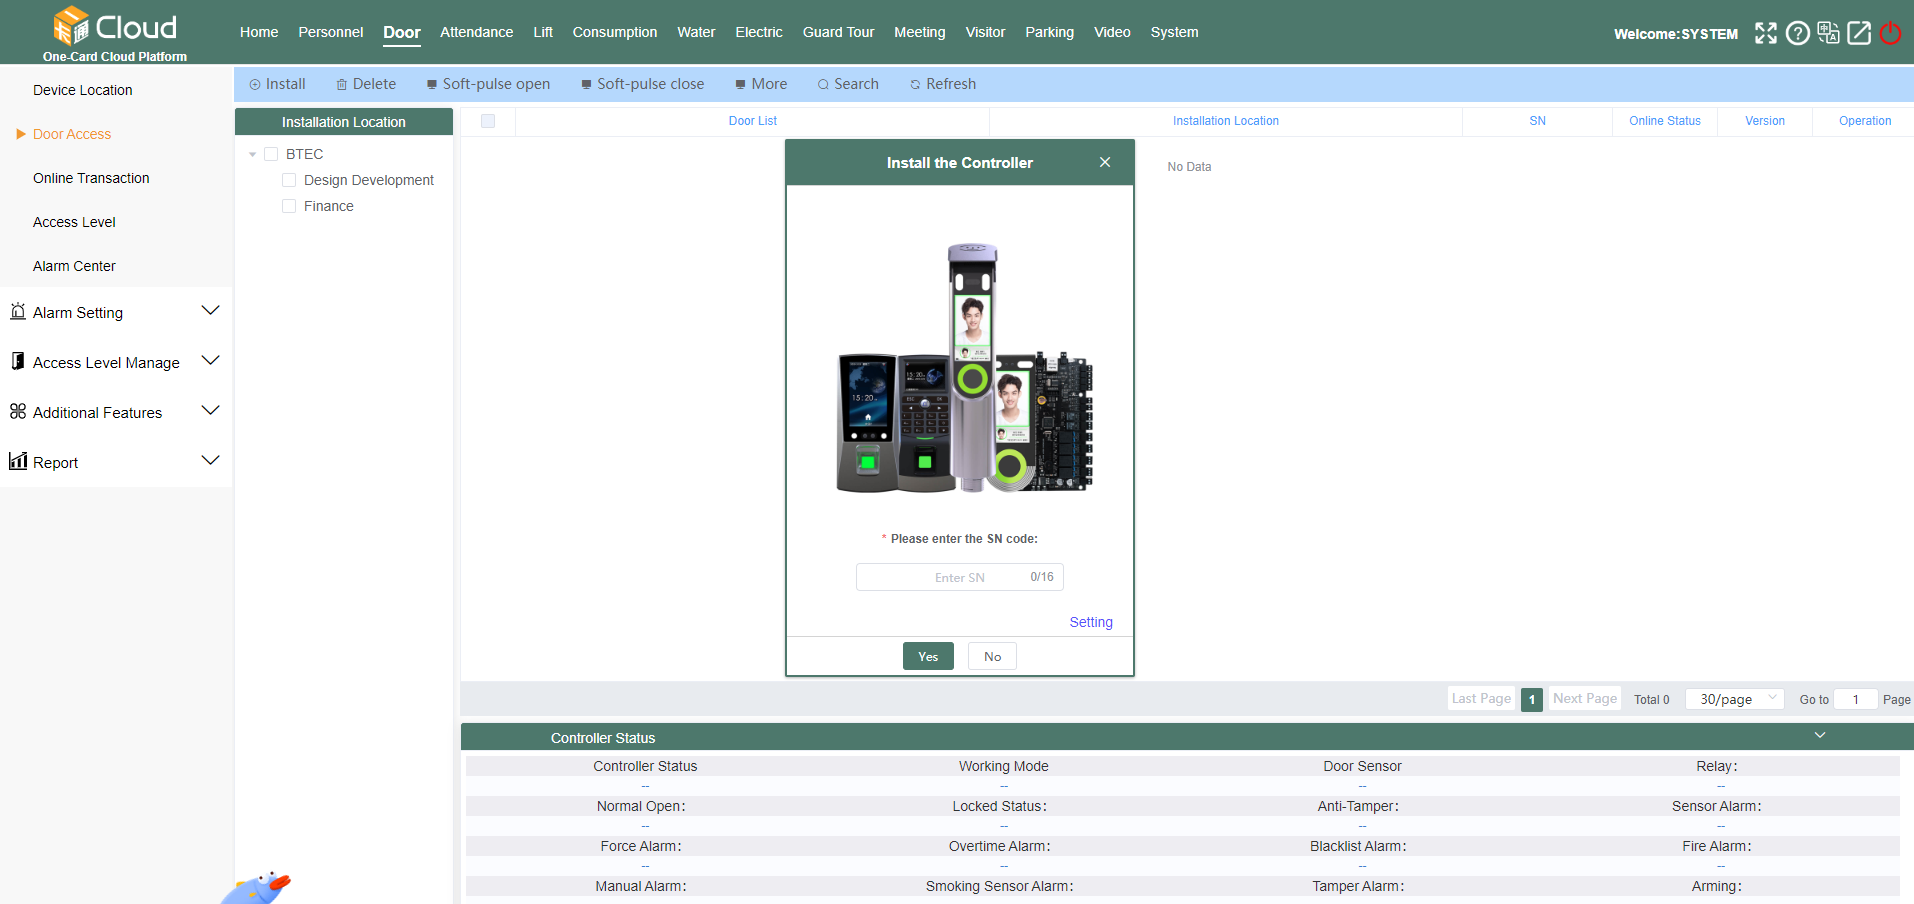
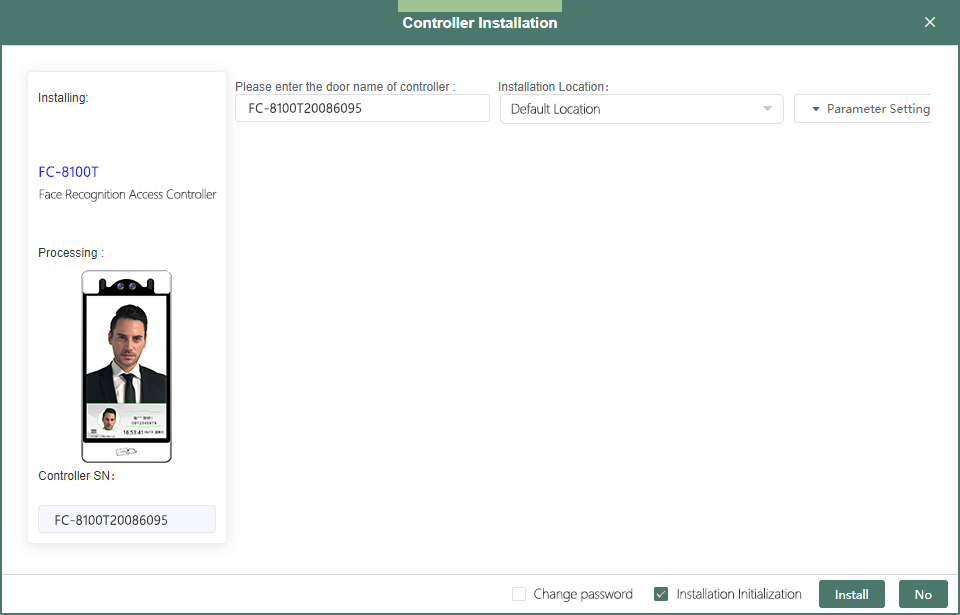
In the pop-up installation interface, the installation interface is shown in the figure below. Select the location to install, select the basic parameters of the equipment, and then click “Install” in the lower right corner. At this time, you will be prompted that the equipment has been successfully installed.
Add personnel and authorization
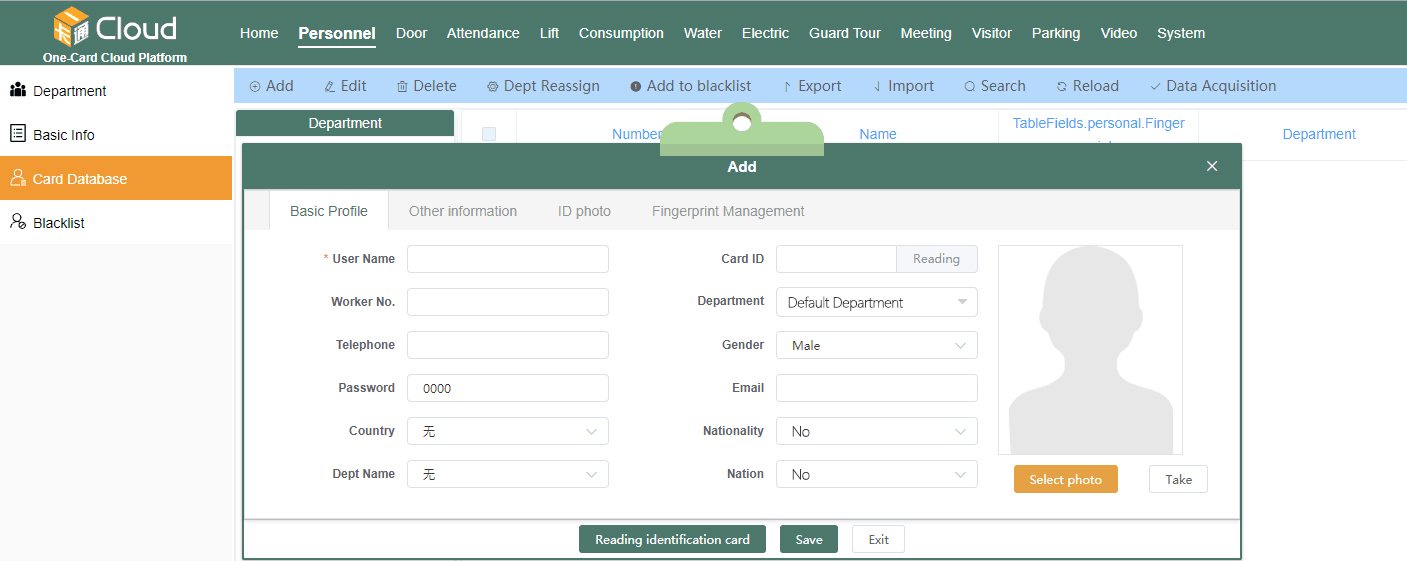
Add people
Click “HR”- “Add” to open the “Add Personnel File Interface”. Enter the personnel information to be added - click “OK”, as shown in the following figure:
Personnel authorization
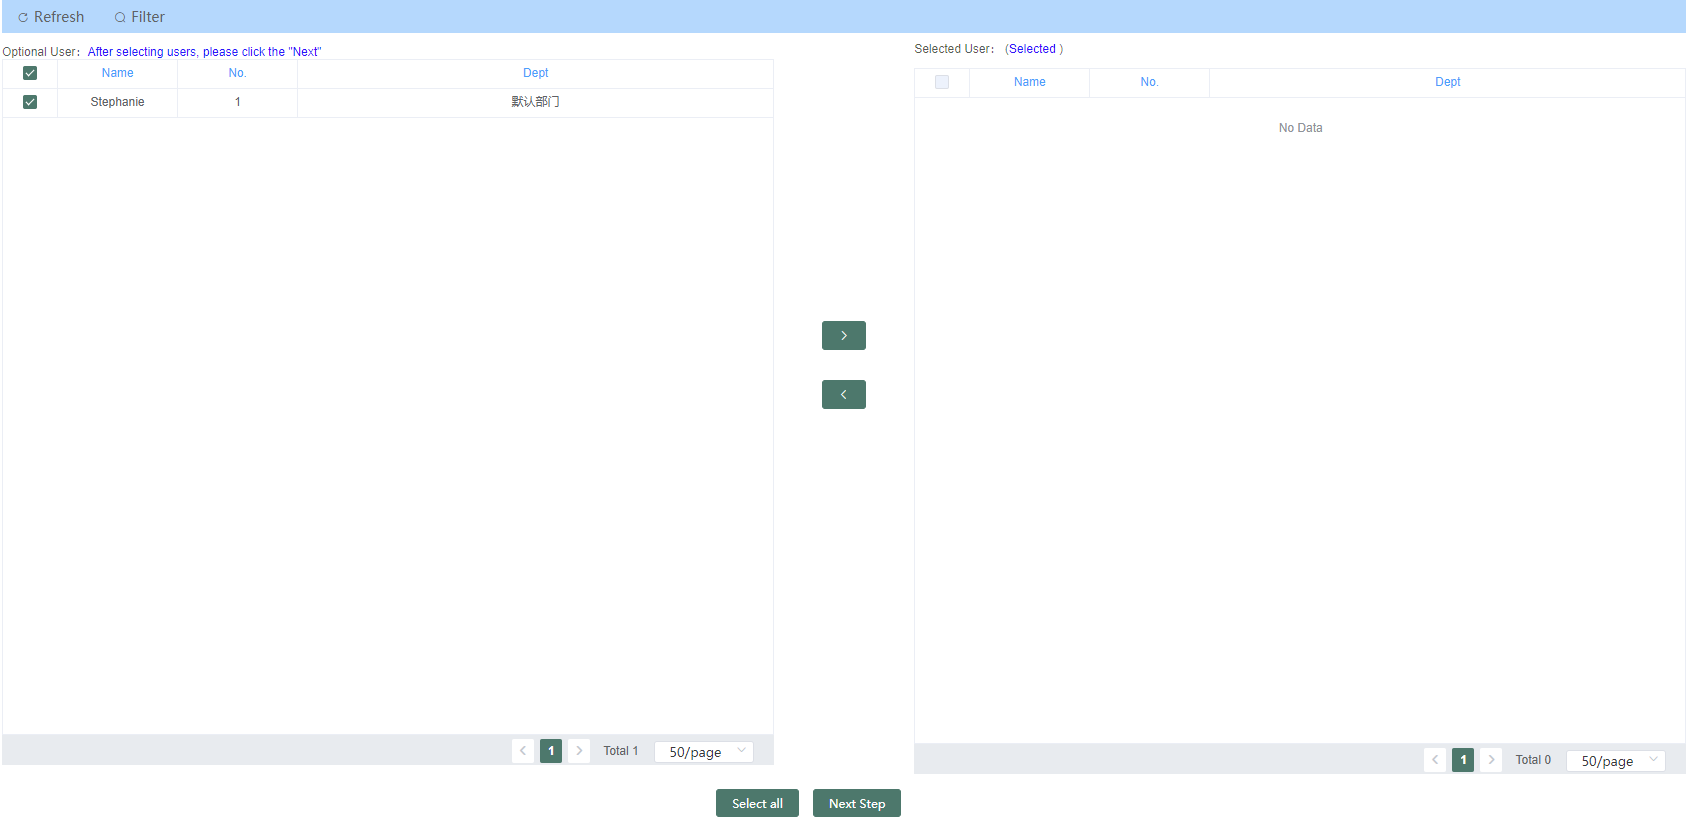
Click “Access Control” - “Permission Authorization”, select the person who needs to set access control permission, and then click next, as shown in the following figure:
[>]: select “User”
[<]: Remove “Selected User”
According to the actual demand, select the parameters such as opening period, opening times, validity period, door name, installation position and so on, and select the door for authorization, as shown in the figure below:
“Prohibit selected personnel from passing through the selected door”delete the access permission of the specified user to the selected door.
“Allow selected personnel to pass through the selected door”add the access permission of the specified user to the selected door.
Record view
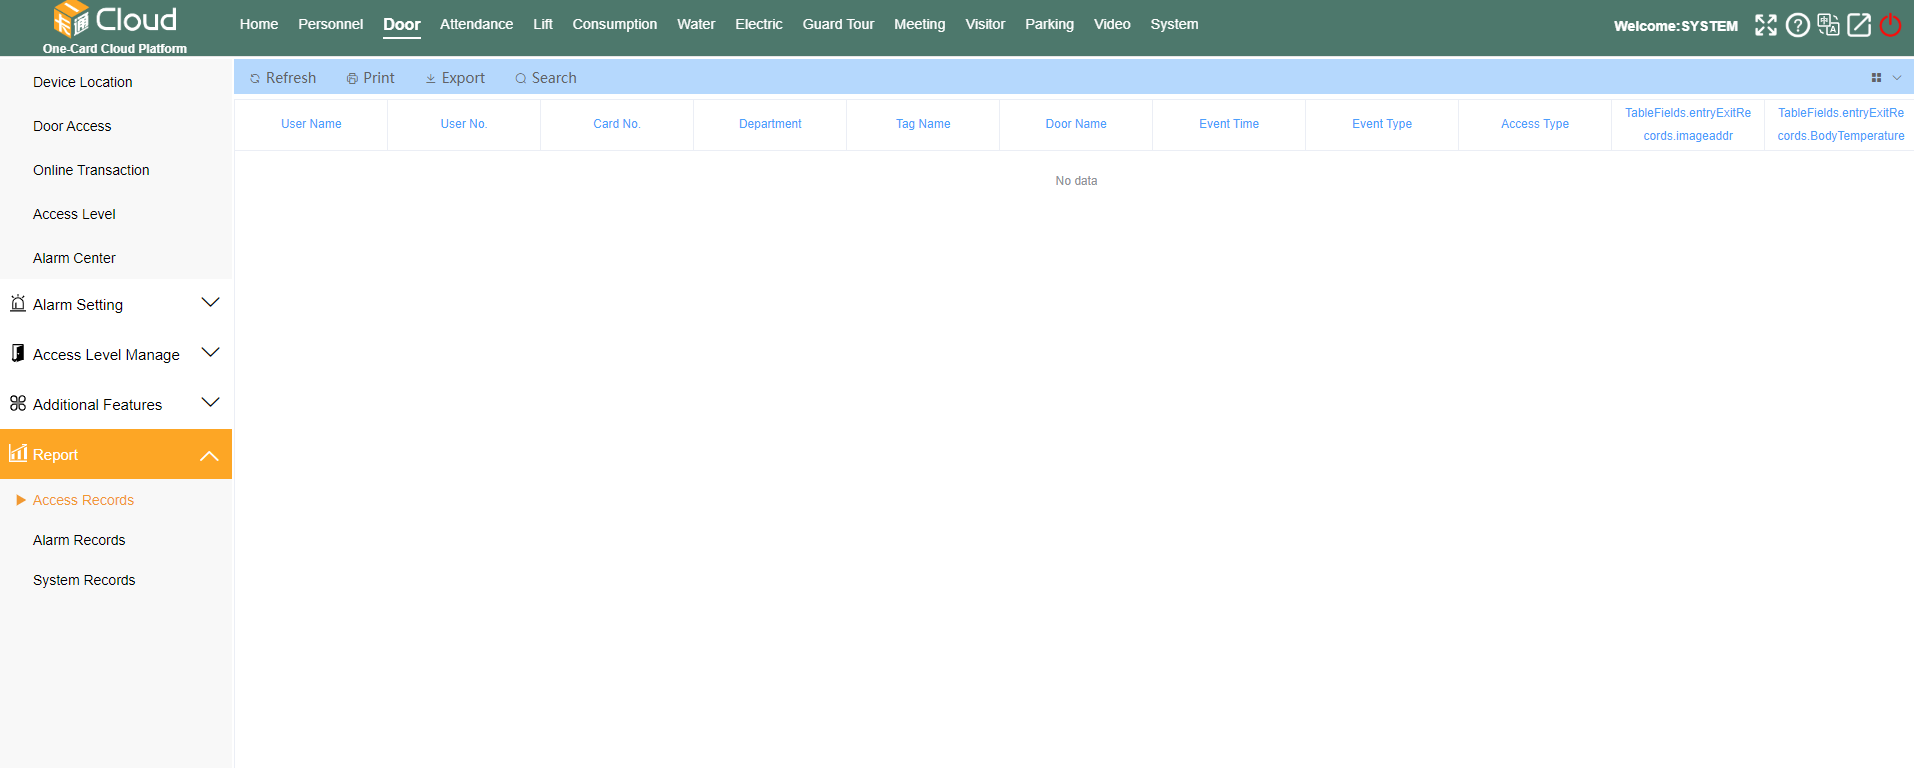
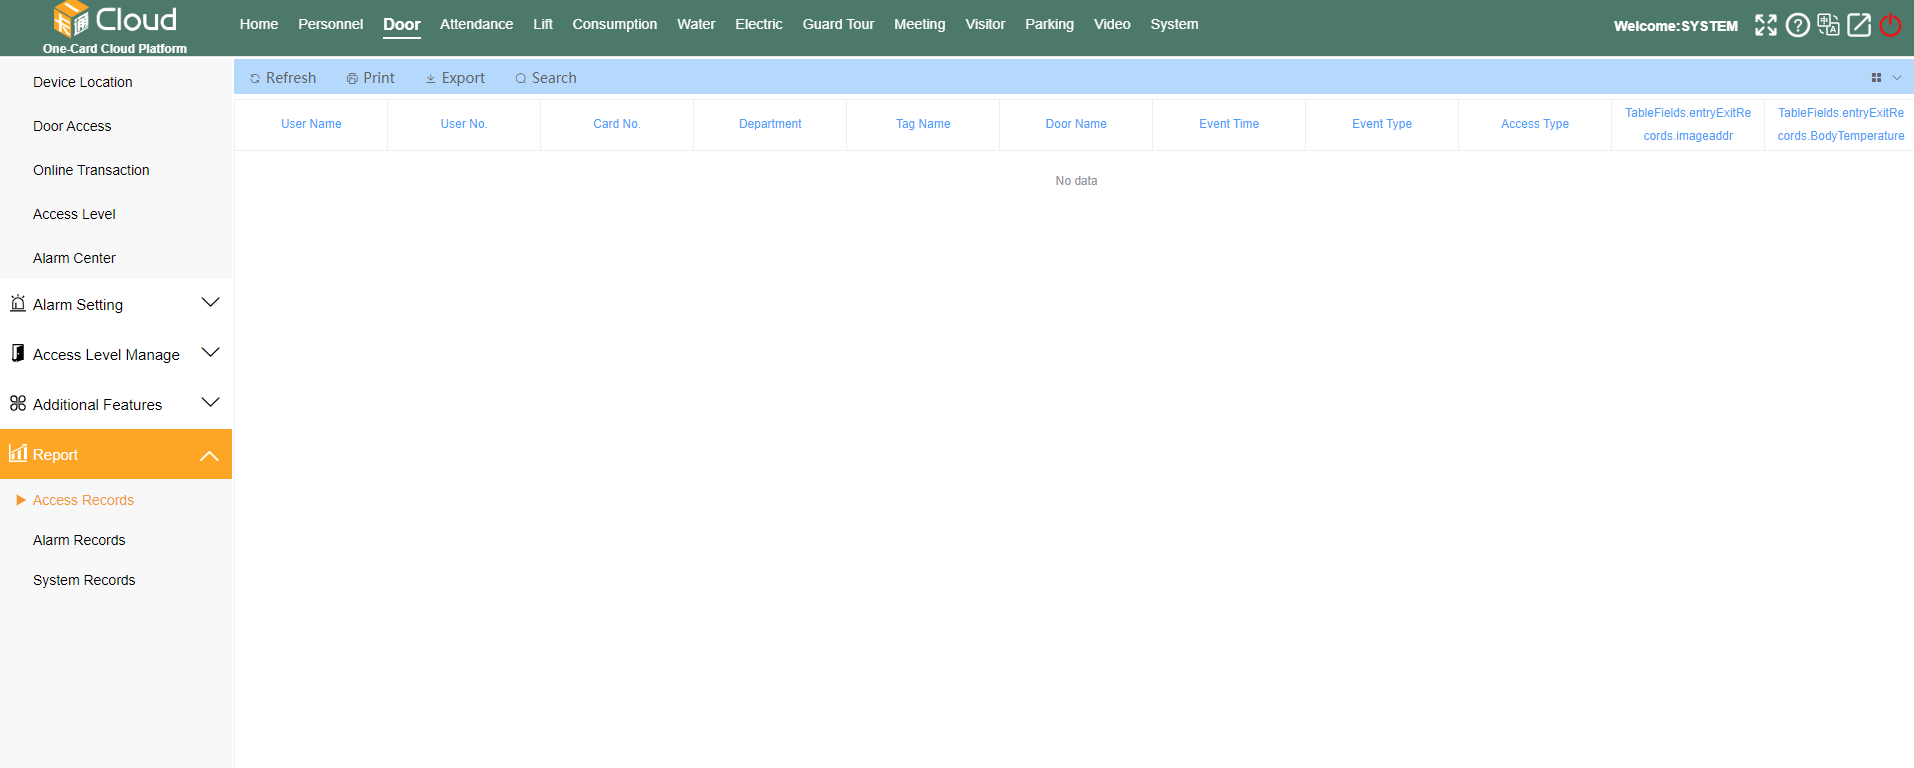
Click “Access Control” - “Access Control Report” and select the records to view or export, including access control access records, access control alarm records and access control system records.
Click the search button to filter the records of the face machine to be viewed according to the requirements, as shown in the following figure:
Click the Export button on the left of the search button to export the excel table of the required records.
